
Introduction
Fried chicken sandwiches have taken the culinary world by storm, becoming a beloved staple at restaurants and home kitchens alike. Their irresistible combination of crispy, golden-brown chicken nestled between soft, pillowy buns makes them a comfort food favorite for many. Whether enjoyed at a backyard barbecue, a casual lunch, or a late-night snack, fried chicken sandwiches deliver satisfaction in every bite.
Among the plethora of fried chicken sandwich recipes, the Crispy Buttermilk Fried Chicken Sandwich stands out as a mouthwatering choice that guarantees flavor and crunch. This homemade version takes the classic fried chicken sandwich to new heights, allowing you to enjoy freshness and flavor that far surpasses anything you can find at a fast-food joint. By preparing it at home, you can control the ingredients, ensuring a dish that is not only delicious but also tailored to your taste preferences.
In this article, we will explore the allure of buttermilk fried chicken, break down the essential ingredients that contribute to this delectable sandwich, and provide you with a detailed step-by-step guide to creating this comfort food masterpiece.
The Allure of Buttermilk Fried Chicken
What makes buttermilk a key ingredient in fried chicken? The answer lies in its unique properties that elevate the flavor and texture of the chicken. Buttermilk is slightly acidic, which helps to tenderize the meat, breaking down protein fibers for a softer bite. Additionally, the richness of buttermilk adds a distinct flavor that complements the spices and seasonings used in the recipe.
The marinating process is crucial for achieving that coveted crispy fried chicken. When chicken is soaked in buttermilk for several hours or overnight, it absorbs moisture and flavor, transforming it into an incredibly juicy and flavorful piece of meat. The buttermilk not only enhances the chicken’s natural taste but also creates a perfect base for the seasoning blend, allowing the spices to penetrate the meat thoroughly.
Fried chicken sandwiches have deep roots in American cuisine, with various regional variations that reflect local tastes and traditions. From the spicy Nashville hot chicken to the classic Southern fried chicken, each version showcases the versatility of this beloved dish. The popularity of fried chicken sandwiches has surged, particularly in recent years, as chefs and home cooks alike experiment with unique flavor combinations and creative toppings. This cultural significance underscores the enduring appeal of fried chicken sandwiches, making them a go-to meal for comfort and indulgence.
Ingredients Breakdown
To create the Crispy Buttermilk Fried Chicken Sandwich, you will need a selection of key ingredients, each playing a vital role in achieving the perfect flavor and texture. Let’s take a closer look at what you will need:
Boneless, Skinless Chicken Thighs
When it comes to fried chicken sandwiches, boneless, skinless chicken thighs are often preferred over chicken breasts. The reason? Juiciness and flavor. Thighs have a higher fat content than breasts, resulting in a more succulent texture that holds up well during frying. This cut of meat absorbs the buttermilk marinade beautifully, ensuring every bite is tender and bursting with flavor.
Buttermilk
As mentioned earlier, buttermilk is the star ingredient in this recipe. Its acidity not only tenderizes the chicken but also adds a rich, tangy flavor that enhances the overall dish. The longer you marinate the chicken in buttermilk, the more pronounced the flavor will be, so don’t rush this step!
Seasoning Blend
A well-balanced seasoning blend is crucial for achieving that signature fried chicken flavor. In this recipe, we will use:
– Garlic Powder: Adds depth and a savory note to the chicken.
– Onion Powder: Complements the garlic and enhances the overall flavor profile.
– Smoked Paprika: Provides a subtle smokiness and vibrant color to the coating.
– Cayenne Pepper: Adds a kick of heat that contrasts beautifully with the richness of the buttermilk.
– Salt: Essential for bringing out the flavors of the chicken and seasoning the batter.
– Black Pepper: Adds a hint of spice and rounds out the seasoning blend.
This combination of spices will create a flavorful crust that elevates the fried chicken sandwich experience.
Burger Buns
The choice of bun can make or break your chicken sandwich. For the best results, opt for soft but sturdy burger buns that can hold up to the crispy chicken and toppings without falling apart. Brioche buns are an excellent choice, as their slight sweetness and buttery texture complement the savory chicken perfectly. Alternatively, potato buns offer a soft and pillowy option that enhances the overall sandwich experience.
Additional Toppings
To take your Crispy Buttermilk Fried Chicken Sandwich to the next level, consider adding fresh toppings that provide brightness and balance to the rich flavors. Popular choices include:
– Lettuce: Adds a refreshing crunch and a touch of color.
– Tomato: Juicy slices bring moisture and a hint of sweetness to the sandwich.
– Pickles: Their tangy flavor cuts through the richness of the fried chicken and adds a satisfying crunch.
– Sauces: Whether it’s a creamy mayonnaise, zesty ranch, or spicy aioli, sauces can enhance the flavor profile and add an extra layer of moisture.
Step-by-Step Cooking Instructions
Now that we’ve covered the essential ingredients, let’s dive into the preparation phase of the Crispy Buttermilk Fried Chicken Sandwich. This section will guide you through the initial steps to ensure your chicken is perfectly marinated and ready for frying.
Preparation Phase
1. Marinating the Chicken:
Begin by preparing your chicken thighs. Trim any excess fat and place them in a large bowl or resealable plastic bag. Pour in enough buttermilk to completely submerge the chicken. Add a pinch of salt and a few shakes of black pepper to the buttermilk for added flavor. Seal the bag or cover the bowl with plastic wrap and refrigerate for at least 4 hours, or preferably overnight. This extended marinating time allows the buttermilk to work its magic, ensuring tender and flavorful chicken.
2. Preparing the Seasoned Flour:
In a separate bowl, combine all the dry ingredients for the seasoned flour. Mix together all the spices mentioned earlier: garlic powder, onion powder, smoked paprika, cayenne pepper, salt, and black pepper. Once well blended, add about two cups of all-purpose flour to the spice mixture. This seasoned flour will create the crispy coating for your fried chicken.
3. Setting Up the Frying Station:
Before frying, it’s essential to set up your cooking station. Choose a heavy-bottomed pot or a deep skillet for frying; cast iron skillets are particularly effective for even heat distribution. Fill the pot with vegetable oil, leaving enough space at the top to prevent overflow when the chicken is added. Heat the oil to 350°F (175°C). A thermometer is recommended to maintain the right temperature, ensuring the chicken cooks evenly and achieves that golden-brown perfection.
4. Dredging the Chicken:
Once the chicken has marinated, remove it from the buttermilk and let any excess drip off. Dredge each piece in the seasoned flour, ensuring an even coating. Press the flour mixture onto the chicken to create a thick, crispy crust. Shake off any excess flour and arrange the coated chicken on a wire rack. This allows the coating to adhere better during frying.
5. Frying the Chicken:
Carefully lower the coated chicken thighs into the hot oil, making sure not to overcrowd the pot, as this can lower the oil temperature and result in soggy chicken. Fry the chicken for about 6 to 8 minutes on each side, or until the internal temperature reaches 165°F (74°C) and the coating is golden brown and crispy. Use a slotted spoon to transfer the fried chicken to a plate lined with paper towels to drain excess oil.
These initial steps set the foundation for creating the ultimate Crispy Buttermilk Fried Chicken Sandwich. By allowing the chicken to marinate properly, preparing a flavorful coating, and ensuring the frying process is executed correctly, you’ll be well on your way to serving up a sandwich that’s sure to impress.
Stay tuned for the next part of this article, where we will discuss assembling the sandwich and share tips for achieving the best results possible.

Importance of Marination Time and Tips for Best Results
The success of a Crispy Buttermilk Fried Chicken Sandwich hinges significantly on the marination process. Allowing the chicken to soak in buttermilk not only enhances its flavor but also tenderizes the meat, making it succulent and juicy. Ideally, marinate the chicken for a minimum of 2 hours, but for best results, aim for overnight. This extended period enables the buttermilk to penetrate the chicken, infusing it with a tangy richness that balances beautifully with the crispy coating.
For optimal marination:
– Use bone-in, skin-on chicken pieces for maximum flavor; however, boneless cuts can also work well.
– Ensure that each piece is fully submerged in the buttermilk to allow for even flavoring and tenderizing.
– For an extra kick, consider adding spices such as cayenne pepper, garlic powder, or paprika to the buttermilk before marinating. This will imbue the chicken with additional depth and complexity.
How to Combine and Prepare the Coating Mixture Effectively
The coating of your fried chicken sandwich is essential for achieving that coveted crispy texture. Start by combining all dry ingredients in a large bowl. A classic coating typically comprises all-purpose flour, cornstarch, baking powder, salt, and pepper. The cornstarch ensures extra crispiness, while the baking powder will help create a light, airy texture.
Coating Mixture Recipe:
– 1 cup all-purpose flour
– 1/2 cup cornstarch
– 1 tablespoon baking powder
– 1 teaspoon salt
– 1 teaspoon black pepper
– Optional: 1 teaspoon smoked paprika, 1/2 teaspoon garlic powder for added flavor
Whisk these ingredients together thoroughly to ensure an even distribution of spices. After marinating the chicken, remove it from the buttermilk and allow excess to drip off. Dredge each piece in the coating mixture, pressing firmly to adhere the flour to the chicken. This step is crucial; ensure that every inch of the chicken is covered to create a thick, crispy crust.
Cooking Phase
Heating Oil to the Proper Temperature
Heating the oil to the right temperature is a critical step in frying chicken. If the oil is too cool, the chicken will absorb too much oil and become greasy. Conversely, if the oil is too hot, the outside will burn before the inside is cooked through. Aim for a temperature of 350°F (175°C). Use a deep-fry thermometer for accuracy.
To test if the oil is ready, drop a small amount of the coating mixture into the oil. If it sizzles and bubbles immediately, you’re good to go. If it browns too quickly, lower the heat and allow it to cool slightly.
Techniques for Dredging Chicken for Even Coating
When dredging the chicken, work in batches to prevent overcrowding the frying pot. Overcrowding will lower the oil temperature, leading to uneven cooking. Use one hand for the wet process (dipping in buttermilk) and the other for the dry process (coating in flour). This technique helps maintain a clean workspace and avoids clumping.
Make sure to shake off any excess flour before placing the chicken in the oil. This will prevent any excess flour from burning during frying, which can lead to off-flavors.
Tips for Frying Chicken in Batches
Fry the chicken in batches of 2-3 pieces, depending on the size of your pan. Maintain a consistent temperature by monitoring the oil’s heat. If the oil temperature drops, give it time to heat back up before adding more chicken. Frying in batches allows for better control over each piece, ensuring they cook evenly and achieve that perfect golden-brown color.
Cook the chicken for about 10-15 minutes, turning occasionally until it reaches an internal temperature of 165°F (74°C). Use a meat thermometer to check for doneness, ensuring that the chicken is thoroughly cooked without drying it out.
Finishing Touches
Instructions for Draining Excess Oil
Once the chicken is cooked, remove it from the oil using a slotted spoon and place it on a wire rack set over a baking sheet. This method allows excess oil to drain away while keeping the chicken crispy. Avoid placing the chicken directly on paper towels, as this can cause steam to build up and make the coating soggy.
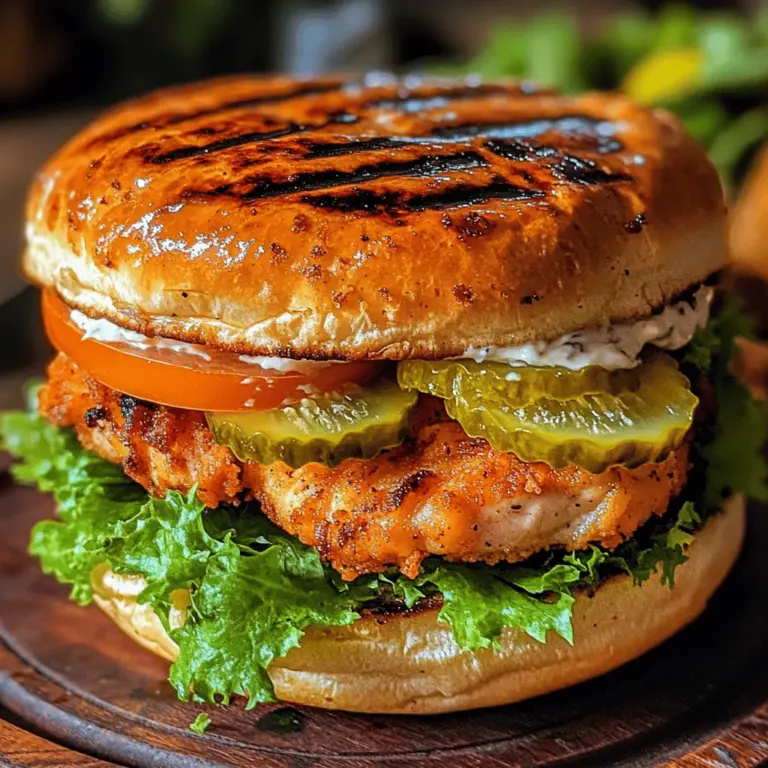
Step-by-Step Assembly of the Sandwich
1. Choose Your Bread: Start with a soft, toasted brioche bun or a classic hamburger bun for the base.
2. Add the Chicken: Place a piece of the crispy fried chicken on the bottom half of the bun.
3. Layer with Condiments: Add a generous dollop of mayonnaise, spicy aioli, or your favorite sauce for richness. A slice of cheese, like cheddar or pepper jack, can be added at this stage for extra flavor.
4. Fresh Vegetables: Top with crisp lettuce, sliced tomatoes, and pickles for freshness and crunch.
5. Close the Sandwich: Finish with the top half of the bun, pressing gently to secure all the delicious layers together.
Serving Suggestions
To complement your Crispy Buttermilk Fried Chicken Sandwich, consider classic side dishes like French fries or coleslaw. French fries provide a perfect crunch that pairs well with the sandwich’s texture, while coleslaw adds a refreshing tang that balances the richness of the chicken.
For a unique twist, try serving the sandwich with sweet potato fries or a side of creamy mac and cheese. You can also consider unique dips such as a spicy honey mustard or a zesty ranch dressing to enhance the meal experience. These sides not only elevate the dish but also provide a variety of flavors and textures.
Nutritional Information
The nutritional content of the Crispy Buttermilk Fried Chicken Sandwich can vary based on the ingredients and portion sizes. On average, one sandwich can contain around 500-700 calories, depending on the bread, toppings, and sauces used. This sandwich typically provides a good source of protein due to the chicken, but it’s also higher in fat due to frying.
To balance indulgence with healthier choices, consider:
– Using whole-grain buns for added fiber.
– Opting for baked or air-fried chicken as a lighter alternative.
– Incorporating more vegetables into your sandwich for extra nutrients.
Conclusion
Making and enjoying a Crispy Buttermilk Fried Chicken Sandwich at home is a delightful culinary adventure that brings satisfaction with every bite. The combination of tender, flavorful chicken encased in a crispy coating, layered with fresh toppings, creates an unforgettable meal. Don’t hesitate to experiment with your personal touches—whether it’s a different sauce, unique spices in the coating, or creative toppings, there are countless ways to make this recipe your own.
So gather your ingredients, embrace the cooking process, and take pleasure in the rewarding experience of crafting this iconic sandwich. Happy cooking!
