
Introduction
There’s something truly heartwarming about the aroma of freshly baked bread wafting through your kitchen. For many, breadsticks evoke cozy memories of family dinners, movie nights, or even that perfect accompaniment to a savory soup. The Cheesy Delight Breadsticks recipe takes this beloved comfort food to new heights by combining the irresistible flavors of cheese with the delightful texture of freshly baked bread. Imagine biting into warm, soft breadsticks, each one oozing with melted mozzarella and sprinkled with savory herbs. These breadsticks are not just a side; they are a culinary experience!
One of the best features of breadsticks is their versatility. They can effortlessly transition from being a delightful side dish to a fulfilling snack or even a charming appetizer at your next gathering. Whether you’re serving them alongside a hearty pasta dish, using them to scoop up marinara sauce, or enjoying them just as they are, these Cheesy Delight Breadsticks are bound to be a hit at any table.
The Appeal of Cheesy Delight Breadsticks
What makes Cheesy Delight Breadsticks so appealing? The answer lies in their comforting flavors and the sheer joy of making them from scratch. The magical combination of gooey mozzarella and the warm, fluffy texture of freshly baked bread creates a symphony of taste and satisfaction. Every bite delivers a delightful crunch on the outside, while the inside remains soft and chewy, with melted cheese that stretches like a dream.
But the experience doesn’t just stop at taste. There’s a certain satisfaction that comes from creating something delicious with your own hands. Kneading the dough, watching it rise, and finally pulling those golden-brown sticks from the oven fills the kitchen with a sense of accomplishment. Plus, using quality ingredients elevates the final product. When you opt for fresh mozzarella, high-quality olive oil, and aromatic herbs, each bite of your homemade breadsticks transforms into a moment of indulgence that store-bought options simply cannot replicate.
Ingredients Breakdown
To achieve the perfect Cheesy Delight Breadsticks, it’s essential to understand the role of each ingredient in the recipe. Here’s a comprehensive breakdown:
– All-Purpose Flour: The backbone of our breadsticks, all-purpose flour provides the necessary structure. It contains the right balance of protein to create gluten, which gives the dough its elasticity and chewiness.
– Instant Yeast: This ingredient is crucial for leavening the breadsticks, allowing them to rise and develop that desirable airy texture. Instant yeast is convenient because it doesn’t require proofing, making the preparation faster and easier.
– Sugar: While it may seem counterintuitive, sugar is vital for enhancing flavor and activating the yeast. It feeds the yeast during fermentation, helping the dough to rise and become fluffy.
– Salt: Beyond its role in flavor enhancement, salt also strengthens the dough by tightening the gluten structure. It balances the sweetness of the sugar and the richness of the cheese, ensuring that the breadsticks are flavorful and well-seasoned.
– Olive Oil: This ingredient contributes to moisture and flavor. Olive oil enriches the dough, resulting in breadsticks that are tender and full of taste. It also helps create a golden-brown crust when baked.
– Warm Water: The temperature of the water is crucial for activating the yeast. Warm water (around 110°F or 43°C) creates an optimal environment for yeast fermentation, leading to a successful rise and perfect dough consistency.
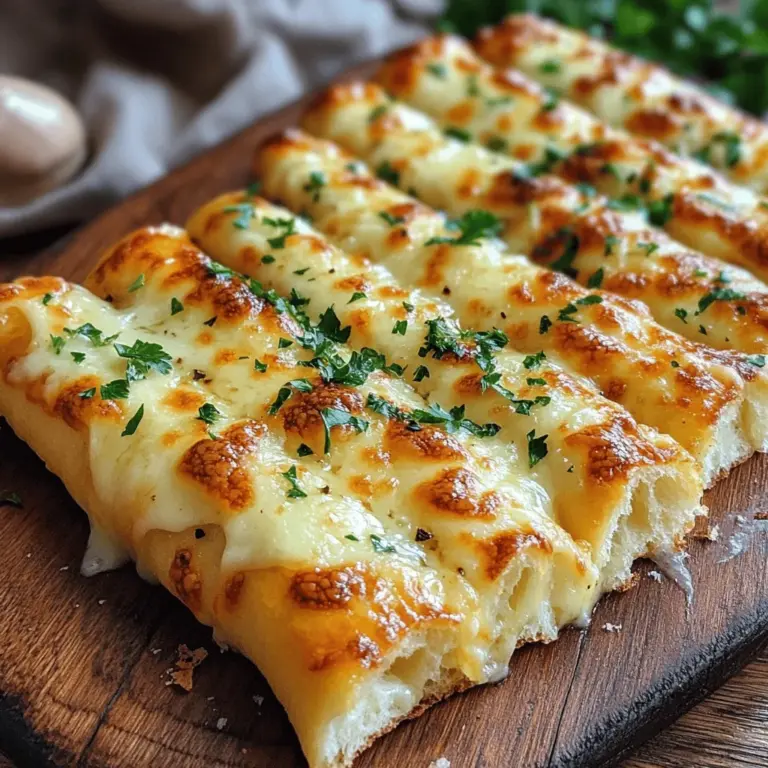
– Mozzarella Cheese: The star of our recipe, mozzarella brings that gooey, melty goodness that makes each bite irresistible. It melts beautifully, creating a stretchy texture that pairs perfectly with the warm breadsticks.
– Parmesan Cheese: Adding a sharp, nutty flavor, parmesan cheese complements the mozzarella. It enhances the overall taste profile and contributes to the delightful crust when sprinkled on top before baking.
– Unsalted Butter: Brushing melted unsalted butter over the baked breadsticks not only enhances flavor but also promotes browning, resulting in a visually appealing golden finish.
– Garlic Powder and Italian Seasoning: These ingredients infuse the breadsticks with aromatic flavors. Garlic powder provides a savory punch, while Italian seasoning adds a blend of herbs that perfectly complements the cheesy goodness.
– Fresh Parsley: This ingredient is not just for decoration; fresh parsley adds a pop of color and a hint of freshness that brightens the flavors of the breadsticks.
Step-by-Step Instructions
Now that we’ve covered the comforting appeal of Cheesy Delight Breadsticks and explored the roles of each ingredient, let’s dive into the step-by-step instructions for preparing this delicious treat:
1. Prepare the Dough: In a large mixing bowl, combine 3 cups of all-purpose flour, 1 packet of instant yeast (about 2¼ teaspoons), and 1 teaspoon of salt. Stir the dry ingredients together until well mixed.
2. Activate the Yeast: In a separate bowl, warm 1¼ cups of water to about 110°F (43°C). Add 1 tablespoon of sugar to the warm water, stirring until dissolved. This sugary water will help activate the yeast.
3. Combine Wet and Dry Ingredients: Gradually pour the warm water mixture into the bowl with the dry ingredients. Add 2 tablespoons of olive oil to the bowl. Mix until a shaggy dough forms.
4. Knead the Dough: Transfer the dough onto a lightly floured surface. Knead the dough for about 5–7 minutes until it becomes smooth and elastic. If the dough is too sticky, add a little more flour as needed.
5. First Rise: Shape the kneaded dough into a ball and place it in a lightly greased bowl. Cover the bowl with a clean kitchen towel or plastic wrap, and let the dough rise in a warm place for about 1 hour, or until it doubles in size.
6. Prepare the Cheese Mixture: While the dough is rising, grate 1 cup of mozzarella cheese and ½ cup of parmesan cheese. Set aside for later.
7. Shape the Breadsticks: Once the dough has risen, punch it down to release the air. Turn it out onto a floured surface and roll it into a rectangle about ½ inch thick. Using a pizza cutter or sharp knife, cut the dough into strips about 1 inch wide.
8. Add Cheese: Take each strip and sprinkle a generous amount of the mozzarella and parmesan cheese over the top. You can fold the dough over the cheese for an extra cheesy center or leave it open-faced for a cheesier topping.
9. Final Rise: Place the cheese-filled strips onto a parchment-lined baking sheet. Cover them again with a towel and let them rise for an additional 30 minutes.
10. Preheat the Oven: While the breadsticks are rising, preheat your oven to 375°F (190°C). This ensures that the breadsticks will bake evenly and develop a golden crust.
As the breadsticks rise and the oven preheats, you can prepare your toppings. Melt 2 tablespoons of unsalted butter and mix in 1 teaspoon of garlic powder and 1 teaspoon of Italian seasoning. This mixture will be brushed over the breadsticks before baking for added flavor.
This step-by-step guide will help you craft delightful Cheesy Delight Breadsticks that are sure to impress. Stay tuned for the final touches and baking instructions in the next part of this article!

Mixing Dry Ingredients for the Dough
To create the perfect base for your Cheesy Delight Breadsticks, start by mixing your dry ingredients. In a large mixing bowl, combine all-purpose flour, instant yeast, sugar, and salt. The sugar not only adds a subtle sweetness but also helps to activate the yeast, ensuring your breadsticks rise beautifully. Instant yeast is preferred for its convenience, as it doesn’t require proofing in water beforehand. Stir the dry ingredients together until they are evenly distributed, creating a uniform mixture that will serve as the foundation for your dough.
Incorporating Wet Ingredients and Forming the Dough
Once your dry ingredients are well mixed, it’s time to incorporate the wet ingredients. Create a well in the center of your dry mixture and pour in warm water and olive oil. The water should be warm to the touch (around 110°F) but not hot, as excessive heat can kill the yeast. Gently mix the ingredients using a wooden spoon or your hands until a shaggy dough begins to form.
After the wet ingredients are evenly distributed, transfer the dough onto a lightly floured surface. This step allows you to knead and bring the dough together more effectively. Gather the dough into a ball, ensuring it’s slightly tacky but not sticky. If necessary, sprinkle a little more flour to achieve the desired consistency.
Kneading Techniques for Achieving the Right Texture
Kneading is crucial for developing the gluten structure in your dough, which gives the breadsticks their chewy texture. To knead, push the dough away from you with the heel of your hand, then fold it over itself. Rotate the dough a quarter turn and repeat this process for about 8 to 10 minutes. The dough should become smooth and elastic. You can test this by performing the “windowpane test”: take a small piece of dough and stretch it gently. If it stretches thin enough to let light through without tearing, you’ve kneaded it sufficiently.
The Importance of Letting the Dough Rise and Proofing Tips
Once kneaded, shape the dough into a ball and place it in a lightly greased bowl. Cover it with a clean kitchen towel or plastic wrap to prevent it from drying out. Let the dough rise in a warm, draft-free area until it doubles in size, which usually takes about 1 hour. This process, known as proofing, is essential as it allows the yeast to ferment, producing carbon dioxide that makes the dough airy and light.
For optimal rising conditions, consider placing the bowl in an oven that has been preheated to the lowest setting for a few minutes and then turned off. Alternatively, placing it near a warm stove or in a sunny spot can also work well.
Preparing the Baking Sheet and Preheating the Oven
As the dough rises, prepare your baking sheet by lining it with parchment paper. This prevents the breadsticks from sticking and makes cleanup easier. Preheat your oven to 425°F (220°C) so that it reaches the perfect temperature while your dough finishes proofing. A hot oven is essential for achieving that golden, crispy exterior that we all love about breadsticks.
Rolling Out the Dough and Cutting Breadstick Shapes
Once the dough has risen, gently punch it down to release the air. Turn it out onto a floured surface and roll it into a rectangle about 1/2 inch thick. The thickness is crucial; too thin, and they may become crispy; too thick, and they could be doughy. Use a sharp knife or a pizza cutter to slice the dough into strips, typically about 1 inch wide.
After cutting the strips, you can twist each piece to create a fun shape, or keep them straight for a classic look. Place the cut strips onto the prepared baking sheet, ensuring they’re spaced evenly to allow for expansion during baking.
Tips for Brushing and Adding Cheese Before Baking
Before baking, brush the tops of the breadsticks with melted butter or olive oil. This adds flavor and ensures a beautiful golden finish. For added delight, sprinkle a generous amount of shredded cheese on top; mozzarella and cheddar are classic choices, but feel free to experiment with your favorites. If you want to enhance the flavor further, consider adding garlic powder, Italian seasoning, or even fresh herbs over the cheese.
Baking Time and Visual Cues for Doneness
Place the baking sheet in the preheated oven and bake for about 12-15 minutes. Keep a close eye on them; you’re looking for a lovely golden color on the tops and a slightly firm texture. If you prefer a crunchier breadstick, you can leave them in for an additional couple of minutes, but be mindful not to over-bake, as they can become dry.
Tips for Perfect Breadsticks
Achieving the perfect Cheesy Delight Breadsticks involves a few key tips:
– Ingredient Temperature: Ensure your ingredients are at room temperature, especially the water and any dairy. Cold ingredients can slow the yeast’s activation.
– Accurate Measuring: Use a kitchen scale if possible to measure your flour accurately. The difference between a cup of flour packed versus lightly spooned can greatly affect the dough’s texture.
– Variations: Feel free to personalize your breadsticks by incorporating different herbs or spices into the dough, such as rosemary, oregano, or red pepper flakes. You can also swap out the cheese for varieties like pepper jack, feta, or even a blend of cheeses for a more complex flavor profile.
– Serving and Pairing Options: These breadsticks pair wonderfully with marinara sauce for dipping, but you can also serve them alongside soups, salads, or as a side to pasta dishes. For gatherings, consider presenting them with a variety of dips like pesto, garlic butter, or a creamy cheese sauce.
Nutritional Information
Understanding the nutritional aspects of your Cheesy Delight Breadsticks is essential for making informed choices:
– Caloric Content: Each serving (2 breadsticks) contains approximately 200 calories.
– Macronutrient Breakdown: You can expect around 8 grams of protein, 8 grams of fat, and 28 grams of carbohydrates per serving.
– Healthier Ingredient Substitutions: If you want to lighten your breadsticks, consider using whole wheat flour instead of all-purpose flour, reducing the cheese, or opting for lower-fat cheese options. You can also experiment with adding pureed vegetables like spinach or zucchini to the dough for extra nutrients.
Serving Suggestions
Cheesy Delight Breadsticks are versatile and can elevate various meals or occasions. Here are some ideas for serving:
– Meals: Pair them with a rich tomato basil soup, a fresh Caesar salad, or a comforting bowl of pasta.
– Occasions: These breadsticks are perfect for game days, birthday parties, or casual family dinners. You can even serve them as an appetizer at holiday gatherings.
– Creative Serving Ideas: Create a breadstick bar at your next gathering, offering an array of dips and spreads. Guests can customize their own breadsticks, making it a fun and interactive experience.
Conclusion
Making Cheesy Delight Breadsticks at home is not just about enjoying a delicious treat; it’s about the joy of cooking and the satisfaction of sharing homemade comfort food with loved ones. This recipe invites you to engage in the culinary process, from mixing and kneading to baking and savoring the fruits of your labor.
We encourage you to try this recipe and share your experiences with family and friends. The warmth and flavor of homemade breadsticks can transform any meal into a special occasion, reminding us of the simple pleasures of life. Embrace the comfort of creating food from scratch, and let these Cheesy Delight Breadsticks become a staple in your kitchen!
