

Introduction
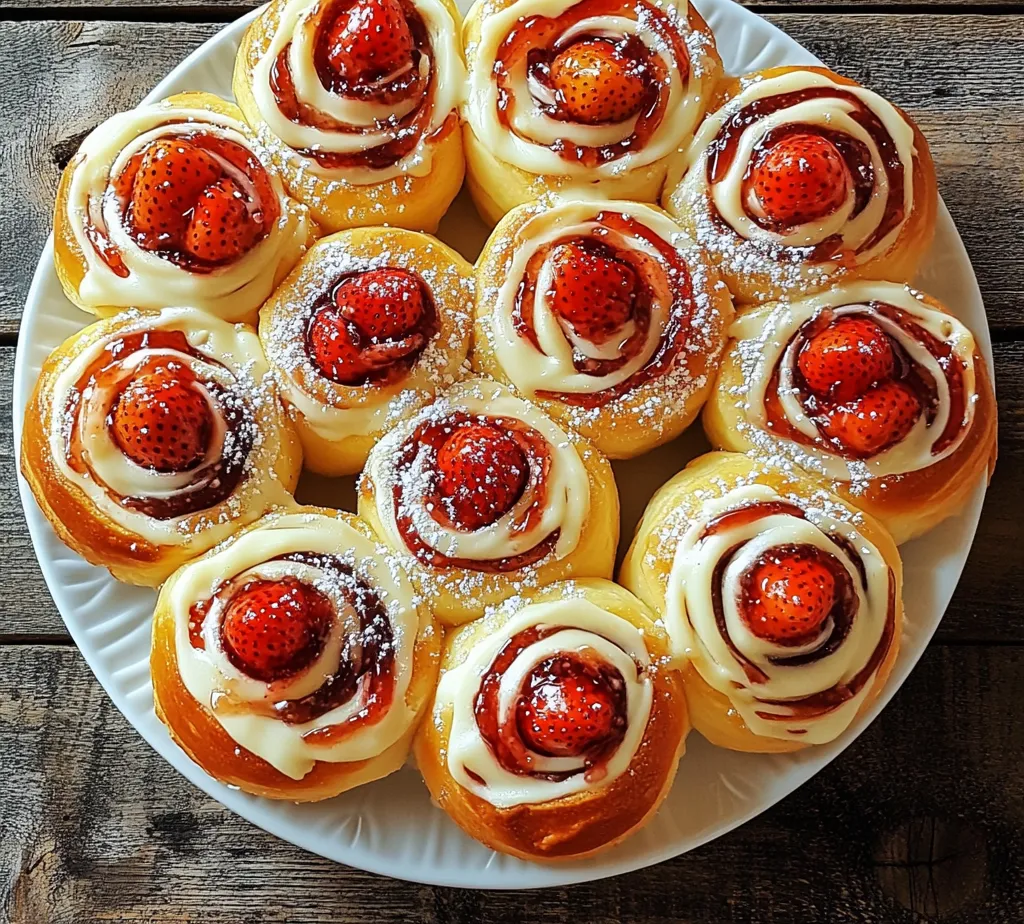
If you’re a fan of decadent desserts, then you’ll absolutely love the exquisite combination of flavors found in Strawberry Cheesecake Sweet Rolls. This delightful treat takes the best elements of two beloved desserts — the creamy richness of cheesecake and the fluffy sweetness of cinnamon rolls — and melds them into a single, mouthwatering experience. Imagine biting into a soft, pillowy roll that’s filled with a luscious cream cheese mixture, swirled with fresh strawberries and topped with a sweet glaze. It’s a harmonious blend of textures and tastes that’s sure to impress anyone lucky enough to try them.
What truly sets this recipe apart is its perfect balance of sweet and tangy flavors, making it an ideal dessert for any occasion, from casual family brunches to festive gatherings. The vibrant strawberry filling provides a burst of freshness, while the cheesecake component adds a luxurious creaminess that melts in your mouth. Plus, there’s something incredibly satisfying about making sweet rolls from scratch. The aroma of fresh-baked goods wafting through your kitchen creates an inviting atmosphere that no store-bought treat can replicate.
Making Strawberry Cheesecake Sweet Rolls at home not only allows you to enjoy them warm and fresh but also gives you the opportunity to customize the recipe to suit your tastes. Whether you prefer more strawberries, a hint of vanilla extract, or even a drizzle of chocolate, the possibilities are endless. So, roll up your sleeves, grab your apron, and let’s dive into this delectable baking adventure!
Understanding the Ingredients
When it comes to baking, the quality of your ingredients can make or break your final product. This is especially true for a recipe like Strawberry Cheesecake Sweet Rolls, where each ingredient plays a crucial role in achieving the perfect flavor and texture. Below, we’ll break down the key ingredients you’ll need and explain their importance in the overall recipe.
Warm Milk
Warm milk is essential in this recipe, as it helps activate the yeast, which is crucial for making the dough rise. The warmth should be around 110°F (43°C) — too hot, and it could kill the yeast, while too cold may not activate it properly. Using warm milk helps create the ideal environment for yeast fermentation, resulting in a light and airy roll.
Active Dry Yeast
Active dry yeast is the leavening agent that gives your rolls their fluffy texture. When dissolved in warm milk, yeast feeds on the sugars present, producing carbon dioxide and alcohol. This process is what causes the dough to rise. If you don’t have active dry yeast on hand, you can substitute it with instant yeast, which doesn’t require proofing and can be mixed directly with dry ingredients.
Sugar
Sugar serves multiple purposes in this recipe. Not only does it sweeten the dough and filling, but it also contributes to the yeast activation process. The yeast consumes the sugar, producing gas that contributes to the dough’s rise. Additionally, sugar enhances the browning of the rolls during baking, giving them a beautiful golden crust.
Butter
Butter is the secret ingredient that adds moisture and richness to the dough. It also improves the texture, making the rolls soft and tender. For the best results, use unsalted butter, as it allows you to control the saltiness of the dough. You can melt the butter or soften it to room temperature; either method works well.
Cream Cheese
The heart of the cheesecake filling, cream cheese, provides that signature tangy flavor that pairs perfectly with the sweetness of the strawberries. It also contributes to the creamy texture of the filling. For the best results, use full-fat cream cheese, which will yield a richer taste and smoother consistency.
Fresh Strawberries vs. Frozen Strawberries
When it comes to strawberries, using fresh ones tends to deliver superior flavor and texture. Fresh strawberries are vibrant, juicy, and bursting with flavor, making them ideal for this recipe. However, if fresh strawberries aren’t available, frozen strawberries can be used as a substitute. Just be sure to thaw and drain them beforehand to avoid excess moisture in the filling.
Optional Ingredients for Customization
To personalize your Strawberry Cheesecake Sweet Rolls, consider adding flavored extracts, such as vanilla or almond, to the cream cheese filling. You could also throw in some lemon zest for a refreshing citrus note. For a little added crunch, chopped nuts or a sprinkle of graham cracker crumbs can be included in the filling, mimicking the crust of a traditional cheesecake.
Step-by-Step Preparation Guide
Now that you have a better understanding of the ingredients, let’s move on to the preparation of these delicious rolls. Follow these step-by-step instructions to ensure your Strawberry Cheesecake Sweet Rolls turn out perfectly.
Preparing the Dough
The first step in making your Strawberry Cheesecake Sweet Rolls is preparing the dough. This process is fairly straightforward, but it’s crucial to pay attention to the temperature and timing to achieve the best results.
Importance of Temperature for Yeast Activation
As mentioned earlier, the temperature of your warm milk is critical for yeast activation. Begin by gently heating the milk until it’s warm but not hot. A thermometer can help you monitor the temperature accurately. Once your milk is at the right temperature, sprinkle the active dry yeast over the surface and let it sit for about 5-10 minutes. You should see it begin to froth and bubble, which indicates that the yeast is active and ready to use. If you don’t see any activity after this time, it’s best to start over with new yeast, as this could compromise your dough.
Visual Cues for When the Yeast is Ready
The yeast is ready when it has expanded and formed a foamy layer on top of the milk. This bubbling indicates that the yeast is alive and will effectively leaven your dough. It’s a simple yet crucial step that sets the stage for your rolls to rise beautifully.
Mixing Wet and Dry Ingredients
In a large mixing bowl, combine the flour, sugar, and salt. Make a well in the center and pour in the activated yeast mixture, followed by the softened butter. Use a wooden spoon or spatula to mix the ingredients until they start to come together. At this stage, you may need to add a little more flour or milk to achieve the desired consistency. The dough should be soft and slightly sticky but not overly wet.
Tips for Achieving the Perfect Dough Consistency
The key to a successful dough is achieving the right consistency. If the dough is too sticky, gradually add more flour, a tablespoon at a time, until it pulls away from the sides of the bowl. Conversely, if the dough feels too dry, add a splash of warm milk. Remember, the dough will continue to absorb flour as you knead it, so don’t be too quick to add extra flour.
Kneading the Dough
Once your ingredients are well combined, it’s time to knead the dough. Turn it out onto a lightly floured surface and use the heels of your hands to push the dough away from you, then fold it back over itself. Rotate the dough a quarter turn and repeat the process. Kneading helps develop gluten, which gives the rolls their structure.
Techniques for Effective Kneading
Kneading should be done for about 8-10 minutes, or until the dough becomes smooth and elastic. If it’s sticking to your hands or the surface, sprinkle a little flour as needed. You should be able to stretch a small piece of dough without it tearing — this is a sign that it has been kneaded sufficiently.
Signs of Well-Kneaded Dough
A well-kneaded dough will be smooth, elastic, and slightly tacky but not sticky. It should spring back when poked and hold its shape well. If you’re unsure, you can perform the “windowpane test” by stretching a small piece of dough between your fingers. If it forms a thin, translucent membrane without tearing, your dough is ready for the next step.
First Rise: Creating the Perfect Environment for Dough to Rise
After kneading, it’s time for the dough to rise. This step allows the yeast to work its magic, resulting in a light and fluffy texture. Place the kneaded dough in a large, greased bowl, turning it once to coat the surface with oil. Cover the bowl with a clean kitchen towel or plastic wrap to keep it warm and moist.
Tips for Finding the Right Warm Spot
For the best rising results, find a warm, draft-free location in your kitchen. An oven with the light on or a warm countertop is ideal. If your kitchen is particularly cool, you can create a makeshift proofing box by placing a bowl of hot water in the oven along with the covered dough. This gentle heat will help the dough rise effectively.
What to Expect During the Rising Process
Allow the dough to rise for about 1 to 1.5 hours, or until it has doubled in size. You’ll know it’s ready when you gently press your finger into the dough, and the indentation remains. This indicates that the yeast has worked its magic, and your dough is ready to be shaped into sweet rolls.
Crafting the Strawberry Cheesecake Filling
While the dough is rising, you can prepare the creamy strawberry cheesecake filling. This step is where the magic happens, transforming your rolls into a delightful dessert.
Mixing the Cream Cheese Filling
In a medium bowl, combine the softened cream cheese, sugar, and any optional flavored extracts you’ve chosen. Using a hand mixer or a whisk, blend the ingredients until smooth and creamy. If you prefer a chunkier filling, you can fold in diced strawberries at this stage for added texture and flavor.
By following these guidelines and understanding the importance of each ingredient, you’ll be well on your way to creating delicious Strawberry Cheesecake Sweet Rolls. The next steps will involve rolling out the dough, adding the filling, and crafting your sweet rolls, which we’ll cover in the next part of this recipe article. Stay tuned for more tips and tricks to ensure your rolls are a resounding success!
Achieving a Smooth Texture
To create the perfect filling for your Strawberry Cheesecake Sweet Rolls, achieving a smooth texture is paramount. Start with softened cream cheese, which will blend seamlessly with your other ingredients. Use a hand mixer or stand mixer on medium speed, mixing until the cream cheese is completely smooth and free of lumps. Gradually add in sugar, a hint of vanilla extract, and a splash of lemon juice. The lemon juice not only adds a delightful tang but also helps to balance the sweetness of the filling, giving it a more complex flavor profile.
Next, incorporate the strawberries and jam. For the strawberries, it’s best to use fresh, ripe berries; however, frozen strawberries can work in a pinch. If using frozen berries, make sure they are thawed and drained before mixing. This prevents excess moisture from making your filling watery. Once the strawberries are ready, fold them gently into the cream cheese mixture along with a few tablespoons of strawberry jam for an added layer of flavor. The jam not only enhances the sweetness but also contributes to the overall strawberry essence that permeates the rolls.
Importance of Allowing the Filling to Stand for Flavor Melding
Once your filling is combined, allow it to sit at room temperature for about 15-20 minutes. This resting period is crucial as it enables the flavors to meld beautifully. The strawberries will release some of their juices, which will enhance the overall flavor of your filling. This short wait will result in a more cohesive and rich filling that elevates your sweet rolls.
Shaping the Sweet Rolls
Rolling Out the Dough
After preparing your dough and letting it rise, it’s time to roll it out. On a lightly floured surface, use a rolling pin to gently flatten the dough into a rectangle. Aim for a thickness of about 1/4 inch. A well-rolled dough ensures that your sweet rolls are even and bake uniformly, so attention to detail here is important.
Techniques for Even Thickness
To achieve an even thickness, start from the center of the dough and roll outward, rotating the dough occasionally to maintain a rectangular shape. If you find that the dough is sticking to your work surface, sprinkle a little more flour underneath, but be careful not to over-flour as this can affect the final texture of the rolls.
How to Avoid Sticking and Tearing
If your dough starts to tear while rolling, it may be too cold or not well-kneaded. Allow it to rest for a few minutes, then try rolling out again. If necessary, use a bench scraper to carefully lift the dough from the surface, which can help prevent sticking and tearing.
Spreading the Filling and Rolling the Dough
Once your dough is rolled out, it’s time to spread the filling. Use an offset spatula or the back of a spoon to evenly distribute the cream cheese mixture across the surface of the dough, leaving about a half-inch border around the edges. This helps to prevent overflow when you roll it up.
Methods for Even Distribution of the Filling
Make sure to distribute the filling evenly by starting from the center and working your way outwards. This ensures that every bite of the roll will be filled with that luscious cheesecake strawberry goodness.
Tips for Tightly Rolling the Dough
To roll the dough tightly, start at one end of the rectangle and slowly roll it towards the other end, keeping it as tight as possible without squishing the filling out. Use your fingers to pinch the seam closed once you reach the end. For an extra seal, you can brush a little water on the seam to help it stick.
Final Rises and Baking
Second Rise: Importance for Fluffy Rolls
After shaping your rolls, place them in a greased baking dish, ensuring they have enough space to rise. Cover them with a clean kitchen towel and allow them to rise for about 30-45 minutes. This second rise is crucial; it allows the rolls to expand and become fluffy, resulting in that pillowy texture that everyone loves.
Timing and Checking for Readiness
Keep an eye on the rolls as they rise. They should double in size, which indicates they’re ready for baking. A gentle poke with your finger should leave an indentation that springs back slowly—if it springs back quickly, they need more time.
Preheating the Oven: Why it Matters
While your rolls are rising, preheat your oven to 350°F (175°C). Preheating is essential as it ensures the rolls begin baking immediately when placed in the oven, helping them to rise further and develop a perfect crust.
The Role of Proper Oven Temperature in Baking
An oven that’s too hot can lead to overbaked rolls with a burnt exterior, while too cool an oven will leave your rolls dense and undercooked. Using an oven thermometer can help ensure your baking environment is just right.
Baking the Rolls: Achieving the Perfect Color and Texture
Bake the rolls for 25-30 minutes, or until they are golden brown on top. The rolls should be puffed and lightly golden, indicating they are perfectly baked. Keep a close eye toward the end of the baking time; they can go from perfectly baked to overdone quickly.
Visual Indicators of Doneness
When done, the rolls should be golden brown and sound hollow if tapped gently on the bottom. Avoid the temptation to open the oven door too frequently as this can disrupt the baking process.
Tips for Avoiding Overbaking
To prevent overbaking, consider using a light-colored baking dish, which helps to reflect heat away from the rolls. If you notice that the tops are browning too quickly, tent them with aluminum foil during the last few minutes of baking.
Creating the Glaze
Ingredients and Method for Preparing the Glaze
While the rolls are cooling, prepare the glaze. You will need powdered sugar, milk, and vanilla extract. In a medium bowl, whisk together 1 cup of powdered sugar with 2-3 tablespoons of milk and a splash of vanilla extract until smooth. The glaze should be thick but pourable; adjust the consistency by adding more milk or powdered sugar as needed.
How the Glaze Enhances the Overall Flavor and Presentation
Once the rolls have cooled for about 10-15 minutes, drizzle the glaze over the top. The sweetness of the glaze beautifully complements the tang of the cream cheese filling and the fresh strawberries, creating a harmonious balance of flavors. It also adds an appealing sheen and a touch of elegance to your sweet rolls.
Optional Variations for the Glaze
For a twist on the classic glaze, consider adding a few drops of lemon juice or almond extract. You can also incorporate crushed strawberries into the glaze for a fruity flavor that ties back to the filling.
Serving Suggestions
Best Ways to Enjoy Strawberry Cheesecake Sweet Rolls
These Strawberry Cheesecake Sweet Rolls are best served warm, straight from the oven or shortly after glazing. The delightful aroma and fresh flavor of strawberries are a perfect way to brighten up your breakfast or brunch table.
Pairing Ideas
Pair your sweet rolls with a hot cup of coffee or a refreshing glass of iced tea. The richness of the cheesecake filling beautifully contrasts with the lightness of these beverages, making for a delightful combination.
Storage Tips for Leftovers
If you have leftovers, store the rolls in an airtight container at room temperature for up to two days. For longer storage, consider freezing the unglazed rolls. Place them in a freezer-safe container, and when ready to enjoy, thaw and bake them at 350°F (175°C) for about 15-20 minutes, then glaze before serving.
Conclusion
Making Strawberry Cheesecake Sweet Rolls is not just about satisfying your sweet tooth; it’s about the joy of creating something that brings people together. The delightful smell of baking rolls, the creamy and fruity filling, and the sweet glaze create a sensory experience that is hard to beat.
Encourage your family and friends to join you in this baking adventure, allowing everyone to share in the joy of creating these delicious rolls. Don’t hesitate to explore more recipes on your baking journey, and keep the tradition of homemade treats alive in your kitchen. Whether for a special occasion or a simple weekend breakfast, these rolls are sure to become a beloved favorite.
