Introduction
As summer rolls in, one of the most cherished seasonal snacks takes center stage: Fried Corn on the Cob. This delightful dish evokes nostalgia for many, reminding us of sun-soaked barbecues, county fairs, and backyard picnics. Whether enjoyed as a standalone treat or paired as a savory side dish, fried corn on the cob delivers a satisfying crunch that complements its naturally sweet and juicy kernels.
The secret to this beloved snack lies in the use of fresh, seasonal corn, which reaches its peak flavor during the summer months. Incorporating local, ripe ingredients not only enhances the dish’s taste but also supports local farmers and promotes sustainable eating practices. Fresh corn is a versatile ingredient that can be found in various culinary traditions, making it a staple in many households.
Crispy textures and savory flavors are hallmarks of comfort food, and nothing embodies these qualities quite like Fried Corn on the Cob. The delightful crunch of a perfectly fried ear of corn is irresistible, making it a favorite among both children and adults. This recipe promises to elevate your corn-eating experience, transforming simple ingredients into a mouthwatering snack that will have everyone reaching for seconds.
The Allure of Fried Corn on the Cob
To truly appreciate Fried Corn on the Cob, it’s essential to understand its historical context. Corn, or maize, has been a staple food for thousands of years, originating from ancient Mesoamerican cultures. It has since spread across the globe, becoming a crucial ingredient in various cuisines. The versatility of corn allows it to be enjoyed in many forms, from tortillas and polenta to popcorn and, of course, corn on the cob.
Fried Corn on the Cob has garnered immense popularity in different regions, particularly in Southern cuisine, where it is often featured at picnics, fairs, and family gatherings. Street food vendors across the United States also capitalize on the appeal of this dish, serving it up hot and crispy, often with a variety of toppings and seasonings. The communal aspect of enjoying corn on the cob, whether at a summer gathering or a bustling street market, adds to its allure.
What sets this recipe apart is not just the simplicity of the ingredients but the unique blend of spices and a special double-coating technique that ensures an extra crunch. By combining the right spices with fresh corn, this dish transforms into a flavorful experience that tantalizes the taste buds. The crispy exterior contrasts beautifully with the tender, juicy interior, making each bite a delight.
Ingredients Breakdown
Fresh Corn: The Foundation of the Recipe
At the heart of Fried Corn on the Cob is, of course, fresh corn. The quality of your corn significantly impacts the final dish’s flavor and texture. When selecting corn, look for bright green husks and plump kernels that are tightly packed together. A quick way to check for freshness is to peel back a small section of the husk and examine the kernels; they should be shiny and milky when pressed.
Corn is not only delicious but also packed with nutritional benefits. It is a good source of dietary fiber, vitamins B and C, and essential minerals such as magnesium and phosphorus. Incorporating this vibrant vegetable into your diet can contribute to overall health and well-being, particularly during the summer months when it is in season.
Flour and Cornmeal: The Two-Part Breading System
To achieve that coveted crispy exterior, a combination of flour and cornmeal is used in the breading process. The flour serves as an excellent base layer, while the cornmeal adds texture and crunch. This two-part breading system ensures that each bite of fried corn is a delightful mix of crispiness and flavor.
When selecting flour, all-purpose flour works well, but those looking for gluten-free options can easily substitute with almond flour or a gluten-free all-purpose blend. The cornmeal itself is naturally gluten-free, making it a perfect choice for those with dietary restrictions.
Spices: Elevating Flavor Profiles
A key component of this recipe is the blend of spices used to season the corn. Garlic powder, smoked paprika, cayenne pepper, salt, and black pepper come together to create a robust flavor profile that complements the sweetness of the corn.
– Garlic Powder: Adds a savory depth that enhances the overall taste.
– Smoked Paprika: Introduces a subtle smokiness, providing a hint of warmth.
– Cayenne Pepper: Offers a kick of heat that can be adjusted based on personal preference.
– Salt: Essential for balancing flavors and enhancing the natural sweetness of the corn.
– Black Pepper: Adds a mild spiciness that rounds out the seasoning.
Feel free to adjust the spice levels to suit your taste. If you prefer a milder flavor, reduce the cayenne pepper or skip it altogether.
Buttermilk: The Secret to Moist, Flavorful Corn
One of the secrets to achieving moist and flavorful Fried Corn on the Cob is the use of buttermilk. This ingredient not only adds a slight tanginess but also helps tenderize the corn, enhancing the overall taste. The acidity in buttermilk acts as a natural marinade, infusing the corn with flavor while keeping it juicy during the frying process.
If you don’t have buttermilk on hand, you can easily create a substitute by mixing regular milk with a splash of vinegar or lemon juice. Let the mixture sit for about five minutes until it thickens slightly, and you’ll have a perfect alternative for your recipe.
Garnishes: Importance of Presentation and Added Flavors
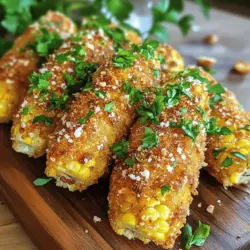
While Fried Corn on the Cob is delicious on its own, garnishing it can elevate the dish even further. Consider topping your corn with freshly chopped parsley to add a pop of color and freshness. For those looking to indulge, a sprinkle of grated parmesan cheese can add a rich, savory finish that complements the crispy exterior beautifully.
Presentation matters, especially when serving this dish at gatherings or special occasions. A well-garnished plate makes for an inviting presentation and enhances the overall dining experience.
Step-by-Step Instructions for Perfect Fried Corn on the Cob
Preparing the Corn: Essential Steps for Cleaning and Prepping
Before diving into the frying process, it’s crucial to prepare the corn properly. Start by removing the husks and silk from each ear of corn. Rinse the corn under cool water to remove any remaining silk and dirt. Pat the corn dry with a clean kitchen towel or paper towels to ensure the breading adheres properly during frying.
Next, cut each ear of corn in half if you prefer smaller, bite-sized pieces. This also allows for easier handling while frying.
Now that your corn is prepped, it’s time to move on to the fun part: breading and frying! Ensure you have all your ingredients ready and organized, as the process will require quick steps to maintain the corn’s freshness and avoid sogginess.
Stay tuned for the next part of this recipe, where we will delve into the detailed instructions for breading and frying your corn to perfection, ensuring each bite is as crispy and delicious as the last.

Importance of Removing Silk and Rinsing
Before diving into the delightful process of frying corn on the cob, it’s crucial to start with clean, fresh corn. Removing the silk—the stringy threads found under the husk—is essential as it can affect the texture and overall enjoyment of your fried corn. Silk can become chewy and unpleasant when cooked, so take the time to peel back the husk and remove all threads thoroughly. After husking, rinse the ears of corn under cool running water to eliminate any residual dirt or debris. This simple step ensures a cleaner, fresher taste in your final dish.
Making the Breading Mixture: Tips for Achieving a Balanced Flavor
The key to achieving a crispy and flavorful coating for your fried corn lies in the breading mixture. Start with a base of all-purpose flour, adding cornmeal for that extra crunch and texture. Season the mixture generously with salt, pepper, and a pinch of cayenne for a slight kick. You can also consider incorporating spices such as paprika, garlic powder, or onion powder to enhance the flavor profile. Aim for a balanced flavor that complements the sweetness of the corn without overpowering it.
Explanation of the Mixing Process and Texture
Once you have your ingredients measured out, combine them in a large mixing bowl. Whisk them together until well blended—your goal is a uniform mixture with no lumps. This is crucial, as uneven breading can lead to inconsistent frying results. The final texture should be slightly coarse, allowing for a good grip on the corn while maintaining the ability to crisp up beautifully when fried.
Buttermilk Bath: Techniques for Ensuring Even Coating
A crucial step in preparing your corn on the cob is soaking it in buttermilk. This not only adds moisture but also helps the breading adhere better during frying. To create a buttermilk bath, simply combine buttermilk with a splash of hot sauce (if desired) for an added flavor boost. Submerge each ear of corn in the buttermilk, ensuring it is fully coated. Allow the corn to soak for at least 30 minutes; this thorough soaking is fundamental in achieving an even coating.
Coating the Corn: The Double-Dipping Method Explained
After the soaking period, it’s time for the double-dipping method, a technique that results in an irresistible crunch. First, remove the corn from the buttermilk, allowing any excess to drip off before rolling it in the flour mixture. Press firmly to ensure an even coat. Next, return the corn to the buttermilk, then roll it in the flour mixture once more. This double layer of breading is what gives fried corn on the cob its signature texture—crispy on the outside and tender on the inside.
How to Achieve Optimal Crunch
Achieving the perfect crunch is all about the frying process and the quality of your ingredients. Make sure to use fresh corn, as older corn can be tough and lose some sweetness. The breading should be applied evenly and should not be too thick; a thin coating allows for better frying and results in a lighter crunch.
Heating the Oil: Safety Tips and Optimal Temperature
Next up is heating the oil, an essential step that requires attention to detail. Use a deep skillet or a heavy-bottomed pot, and fill it with enough oil to submerge the corn at least halfway. A neutral oil, such as vegetable oil or canola oil, works best. Heat the oil over medium-high heat until it reaches about 350°F (175°C). To check if the oil is ready, drop a small pinch of the breading mixture into the oil; if it sizzles and rises to the surface, you’re good to go. Always be cautious when working with hot oil to avoid burns or flare-ups.
Signs That the Oil Is Ready for Frying
Recognizing the right temperature for frying is crucial. If the oil is too hot, the breading will burn before the corn is cooked through. Conversely, if it’s not hot enough, the corn will absorb excess oil, resulting in a greasy finish. Look for small bubbles forming around the edges of the pot; this is a good indicator that the oil is ready. A frying thermometer is also a handy tool to ensure precision.
Frying Techniques: Best Practices for Achieving Golden Brown Perfection
When it comes to frying, patience is key. Carefully lower the coated corn into the hot oil—avoid overcrowding the pot, as this can cause the temperature to drop and lead to uneven frying. Fry the corn for about 5-7 minutes, turning occasionally until all sides are golden brown and crispy. If using a thermometer, maintain the temperature consistently at around 350°F to achieve that perfect crunch.
Importance of Batch Cooking for Even Frying
To ensure even frying and prevent steaming, it’s wise to work in batches. Frying too many ears of corn at once can lead to a soggy texture and uneven cooking. After frying each batch, place the corn on a plate lined with paper towels to absorb excess oil. This step is critical for maintaining that crispy finish.
Draining and Serving: Ensuring a Crispy Finish
Once the corn is golden brown, it’s time to drain it properly. Use a slotted spoon to remove the corn from the oil, allowing it to drain for a few seconds before transferring it to the paper towel-lined plate. This will help prevent the breading from becoming soggy. Serve the fried corn on the cob hot for the best experience, as it tends to lose its crispiness over time.
Techniques for Draining Excess Oil Effectively
To achieve the crispiest corn possible, consider using a wire rack for draining instead of paper towels. A wire rack allows air to circulate around the corn, preventing steam buildup and maintaining that coveted crunch.
Garnishing: Final Touches for a Restaurant-Style Presentation
For a restaurant-style finish, consider garnishing your fried corn on the cob with finely chopped herbs, such as parsley or cilantro, for a pop of color. A sprinkle of grated cheese can also elevate the dish, providing an additional layer of flavor. Serve with lime wedges and a drizzle of your favorite sauce—think garlic aioli, chipotle mayo, or even a classic ranch dressing for dipping.
Nutritional Information
When it comes to enjoying fried foods, moderation is key. Each serving of fried corn on the cob typically contains approximately 200-250 calories, with a breakdown of around 10-15 grams of fat, 30-35 grams of carbohydrates, and 4-6 grams of protein, depending on the breading and frying method used. While fried foods can be indulgent, using fresh, high-quality ingredients can help mitigate some health concerns. Fresh corn is rich in vitamins and minerals, making it a more nutritious choice compared to processed alternatives.
Discussion on the Health Aspects of Enjoying Fried Foods in Moderation
Enjoying fried foods doesn’t have to be guilt-ridden. The key is balance; incorporating fried dishes into an overall healthy diet can be achieved by pairing them with fresh vegetables or salads. Additionally, opting for healthier frying methods, such as using high-quality oils and fresh produce, can enhance the nutritional value of the meal.
Serving Suggestions
Fried corn on the cob is incredibly versatile and pairs wonderfully with a variety of dips. Consider serving it with zesty options like a spicy salsa, tangy barbecue sauce, or a refreshing avocado cream. For homemade dips, mix Greek yogurt with lime juice and cilantro for a healthy alternative or whip up a classic ranch dressing for a crowd-pleaser.
Integrating fried corn into your meals can elevate barbecues, picnics, and family gatherings. Serve it alongside grilled meats, fresh salads, or even as a fun appetizer at parties. For a creative twist, skewer the fried corn for easy eating, or arrange them on a platter for a beautiful presentation that’s sure to impress your guests.
Conclusion
The joy of making and sharing fried corn on the cob lies in its ability to bring people together. Whether enjoyed at a summer barbecue or as a cozy family dinner treat, the satisfying crunch and sweet corn flavor create a delightful experience. Don’t hesitate to experiment with different seasonings, sauces, and presentation styles to make this dish your own. Food is not just nourishment; it’s a communal activity that fosters connection, laughter, and shared memories. So gather your loved ones, whip up a batch of crispy fried corn on the cob, and savor the delicious moments together.