
Introduction
There’s something truly special about the aroma of fresh bread wafting through your kitchen. Homemade rolls, warm from the oven and slathered with butter, have a way of bringing comfort and joy to the dinner table. Among all the delightful bread recipes, Buttery Garlic Bliss Rolls hold a special place, captivating hearts and palates alike. These rolls are not just a side dish; they are an experience—a perfect accompaniment that elevates any meal, be it a simple family dinner or a festive gathering.
The magic of Buttery Garlic Bliss Rolls lies in their irresistible flavors. A rich blend of garlic and butter infuses each bite, creating a symphony of taste that complements savory dishes beautifully. The process of baking these rolls from scratch is not only rewarding but also allows you to control the quality and freshness of the ingredients. With each step, from mixing the dough to the final golden-brown finish, you’ll find joy in the simplicity and satisfaction of homemade baking.
If you’re ready to embark on this culinary adventure, let’s dive into the details of the ingredients that make these rolls so special.
Understanding the Ingredients
To create the perfect Buttery Garlic Bliss Rolls, it’s essential to understand the role of each ingredient. Each component contributes to the overall flavor, texture, and structure of the rolls, making them a delightful addition to any meal.
All-Purpose Flour
All-purpose flour serves as the foundation of the rolls. Its balanced protein content allows for the ideal rise and texture. When combined with yeast, it helps create a light and airy interior while maintaining enough structure to hold the rolls together. Choosing high-quality flour can make a noticeable difference in the final product, so look for brands that are known for their consistency.
Instant Yeast
Yeast is the heart of bread-making, responsible for the fermentation process that causes the dough to rise. Instant yeast is particularly convenient because it can be mixed directly with the dry ingredients without needing to be activated in warm water first. This not only saves time but also ensures a consistent rise in the dough. The yeast ferments the sugars in the dough, producing carbon dioxide and alcohol, which helps create a light and fluffy texture in the rolls.
Sugar
Sugar plays a dual role in this recipe. First, it activates the yeast, providing it with the necessary food to produce carbon dioxide. This activation is crucial for achieving the desired texture in the rolls. Second, sugar enhances the flavor, adding a touch of sweetness that balances the savory elements of garlic and butter. It also contributes to the browning of the rolls during baking, giving them a beautiful golden crust.
Salt
Salt is essential in baking, not just for flavor but also for its role in dough structure. It strengthens the gluten network, which is vital for the bread’s texture. Additionally, salt acts as a flavor enhancer, balancing the sweetness from the sugar and the richness from the butter. However, it’s important to use it in moderation—too much salt can inhibit yeast activity and prevent the dough from rising properly.
Warm Milk
Warm milk is a key ingredient that creates an ideal environment for yeast activation. It should be heated to a temperature that is warm to the touch but not hot, as excessive heat can kill the yeast. The warmth helps to dissolve the sugar and salt, promoting even mixing throughout the dough. Furthermore, milk adds richness and moisture to the rolls, resulting in a tender crumb.
Unsalted Butter
Using unsalted butter is crucial in this recipe as it allows for precise control over the salt content. Unsalted butter is also fresher than salted butter, which can vary in saltiness depending on the brand. The butter adds richness and flavor to the rolls, making them irresistibly buttery and delicious. It will be melted and brushed onto the rolls before baking, enveloping them in a warm, golden hug of flavor.
Garlic
Garlic is the star ingredient that elevates these rolls from ordinary to extraordinary. Fresh garlic, minced finely, infuses the dough with its aromatic flavor. The garlic melds beautifully with the butter, creating a savory profile that pairs perfectly with the sweetness of the rolls. Using fresh garlic is essential for achieving the best flavor; pre-minced or jarred garlic can lack the vibrancy and potency that fresh cloves provide.
Fresh Parsley
Fresh parsley serves as a bright and colorful garnish, adding a hint of freshness to the rolls. It also offers a subtle earthiness that complements the rich flavors of butter and garlic. Chopped parsley can be mixed into the dough or used as a topping before serving, providing an appealing contrast against the golden crust of the rolls.
Black Pepper
A pinch of black pepper adds a subtle hint of spice, enhancing the overall flavor profile without overpowering the other ingredients. It provides depth and complexity, balancing the richness of the butter and the sweetness of the rolls. Freshly cracked black pepper is preferred, as it delivers a more robust flavor compared to pre-ground varieties.
Egg Wash
An egg wash is an essential step in achieving a beautiful golden crust on the rolls. It creates a shiny, glossy finish that enhances the visual appeal of the rolls. The egg wash can be prepared by whisking together an egg with a splash of water or milk, then brushed gently over the rolls before baking. This simple step makes a significant difference in the presentation of your Buttery Garlic Bliss Rolls.
Step-by-Step Preparation Guide
Now that we have a clear understanding of the ingredients, it’s time to dive into the preparation process. Making Buttery Garlic Bliss Rolls is a rewarding experience that involves several key steps—from mixing the dough to kneading it into a smooth, elastic consistency. Follow these steps to ensure your rolls turn out perfectly every time.
Mixing the Dough
Begin by gathering all your ingredients in a clean, spacious workspace. Start by measuring out the all-purpose flour, sugar, salt, and instant yeast into a large mixing bowl. Use a whisk to combine these dry ingredients thoroughly, ensuring that the yeast is evenly distributed. This step is crucial for achieving a consistent rise and flavor throughout the rolls.
Next, warm the milk in a small saucepan or microwave until it’s warm to the touch—approximately 110°F (43°C). Be cautious not to overheat it, as temperatures above 120°F (49°C) can kill the yeast. Once the milk is ready, add the melted unsalted butter and minced garlic to the warm milk, stirring to combine. The heat from the milk will help dissolve the butter, creating a smooth mixture.
Now, create a well in the center of your dry ingredients and pour the warm milk mixture into it. Using a spatula or wooden spoon, gently stir the ingredients together until a shaggy dough begins to form. At this stage, the dough may appear a bit sticky and rough, but that’s perfectly normal.
Importance of Temperature and Timing for Yeast Activation
Allowing your dough to rise properly is critical for achieving the fluffy texture characteristic of Buttery Garlic Bliss Rolls. After mixing the dough, cover the bowl with a clean kitchen towel or plastic wrap. Place it in a warm, draft-free area of your kitchen, such as near a preheated oven or on top of the refrigerator. Let the dough rise for about 1 to 1.5 hours, or until it has doubled in size. This time allows the yeast to ferment and produce the gases needed for leavening.
Techniques for Combining Wet and Dry Ingredients
When combining the wet and dry ingredients, it’s important to be gentle. Overmixing can lead to tough rolls instead of the tender texture we desire. Once the dough starts to come together, switch to using your hands to knead it lightly in the bowl until it forms a cohesive mass. At this point, you can also add in the chopped fresh parsley and a pinch of black pepper, folding them into the dough.
Kneading the Dough
Kneading is a crucial step in developing the gluten structure of the dough, which gives the rolls their characteristic chewiness. After your dough has come together, transfer it to a lightly floured surface. Sprinkle a little flour on top of the dough to prevent sticking, then press down gently with the palms of your hands.
To knead, fold the dough over itself, pushing it away from you with the heel of your hand. Rotate the dough a quarter turn and repeat the process. Continue kneading for about 8-10 minutes, or until the dough is smooth and elastic. You can test the dough’s readiness by performing the “windowpane test”: stretch a small piece of dough between your fingers. If it forms a thin, translucent membrane without tearing, it’s ready for the next step.
After kneading, shape the dough into a ball and place it in a greased bowl. Cover it again, allowing it to rise for another 30-45 minutes until it doubles in size.
With the dough rising and the kitchen filled with the delightful aroma of garlic and butter, you’re well on your way to creating these mouthwatering Buttery Garlic Bliss Rolls. In the next section, we will explore the shaping and baking process that will bring these rolls to life, ensuring they become a beloved addition to your dining table. Stay tuned for the continuation of this delicious journey!
Kneading Techniques and Desired Dough Texture
Achieving the perfect dough texture is crucial for making Buttery Garlic Bliss Rolls. Kneading is the process that develops gluten in the dough, giving it structure and elasticity. To knead effectively, start by flouring your work surface lightly to prevent sticking. Place the dough on the surface and fold it over itself, then push down with the heels of your hands. Turn the dough a quarter turn and repeat. This rhythmic motion should continue for about 8-10 minutes until the dough feels smooth and elastic.
The desired dough texture should be soft, slightly tacky, but not overly sticky. You should be able to stretch a small piece of dough into a thin “windowpane” without tearing. If the dough feels too sticky, add a little more flour; if it feels dry, a splash of water can help. Remember, every flour brand can absorb moisture differently, so adjustments may be necessary.
First Rise: Creating the Perfect Environment for Dough
Once your dough is kneaded to perfection, it’s time for the first rise. This step is essential for developing flavor and texture. The ideal environment for dough to rise is a warm, draft-free area where the yeast can activate and produce carbon dioxide.
To create this environment, you can preheat your oven to the lowest setting for a few minutes, then turn it off. Place the dough in a bowl, cover it with a damp cloth or plastic wrap, and set it in the warm oven. Alternatively, a sunny spot in your kitchen can work wonders, or even the top of a warm stove if it’s in use. Allow the dough to rise until it has doubled in size, which typically takes about 1 to 1.5 hours.
Tips for Finding a Warm Place to Let the Dough Rise
Finding the right spot for dough to rise can be a game-changer. Besides the oven method, consider these tips:
– Microwave Trick: Put a cup of hot water in the microwave and close the door. The steam creates a warm, humid environment, perfect for rising dough.
– Heating Pad: If you have a heating pad, place it on a low setting and cover the dough with a towel while it rests on top.
– Warm Room: If it’s a sunny day, simply placing the bowl near a window can promote an effective rise. Just ensure it’s not in direct sunlight for too long, as it can overheat the dough.
Shaping the Rolls
After the first rise, it’s time to shape your rolls. Gently punch down the dough to release the air, then turn it out onto a lightly floured surface. Divide the dough into equal portions — about 12 pieces for standard-sized rolls.
To shape the rolls, take one dough portion and flatten it slightly with your hands. Then, fold the edges toward the center to create a ball. Turn the dough ball over so the seam side is facing down and gently rotate it on the surface using your palm to create a smoother surface. This technique helps to create tension in the dough, which is essential for achieving a nice rise in the oven.
Second Rise: The Importance of Patience Before Baking
Once shaped, the rolls need a second rise. This step is crucial as it allows the rolls to puff up and develop a light, airy texture. Place the shaped rolls in a greased baking dish, ensuring they are close but not touching. Cover them loosely with a kitchen towel or plastic wrap and let them rise for an additional 30-45 minutes until they have doubled in size again.
Patience is key during this phase; resist the temptation to rush it. The yeast needs time to work its magic. If you notice that the dough is rising slowly, it may be due to a cooler temperature. In that case, consider placing the dish in a warmer spot, similar to the first rise.
Creating the Flavorful Garlic Butter
As the rolls rise, you can prepare the garlic butter that will take your rolls to the next level. Start by melting a generous amount of unsalted butter in a small saucepan over low heat. Once melted, add minced garlic — the aroma will be intoxicating.
For an added layer of flavor, consider infusing the butter with fresh herbs such as parsley or thyme. Simply add them to the melted butter along with the garlic. Using fresh herbs enhances the taste and provides additional health benefits, such as anti-inflammatory properties.
Timing is important in this process. You want the garlic to soften and infuse the butter without burning. Cook it for just 1-2 minutes until fragrant. Remove from heat and let it cool slightly before brushing it generously over the rolls after baking.
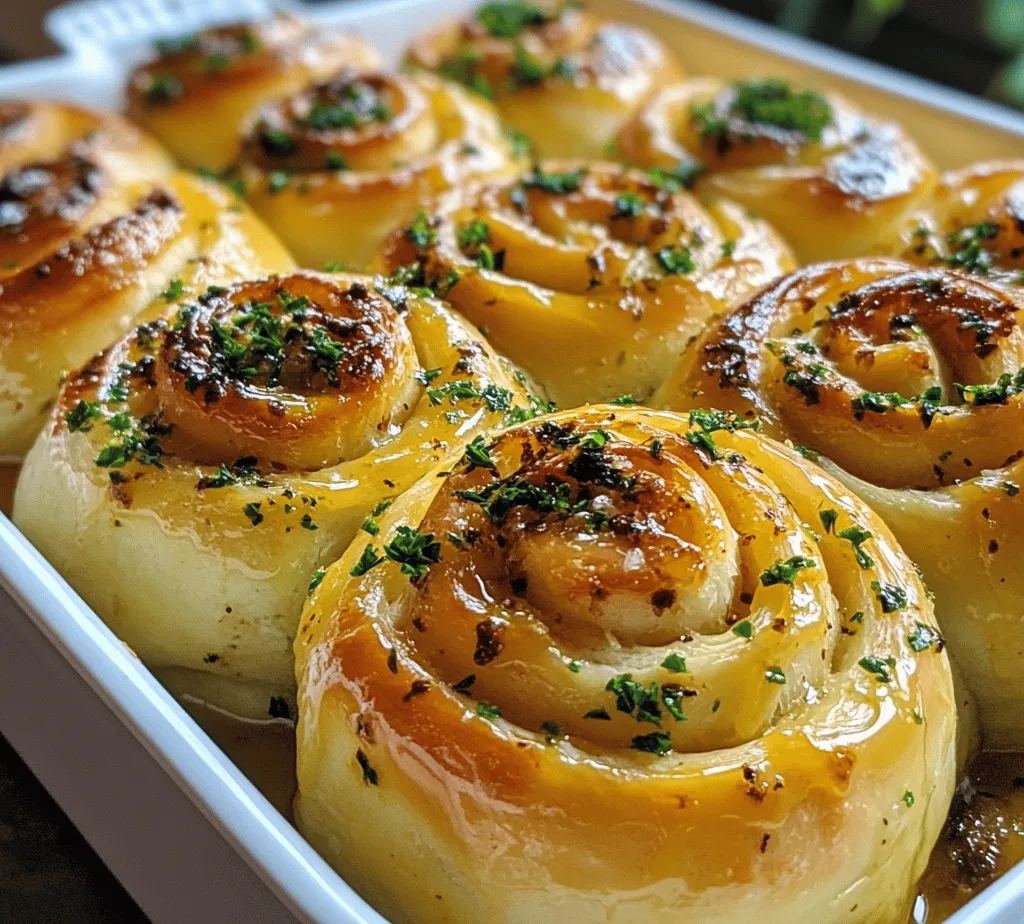
Baking the Rolls
Finally, it’s time to bake your Buttery Garlic Bliss Rolls. Preheat your oven to 375°F (190°C). While the oven heats, you can prepare your baking dish by greasing it lightly with butter or cooking spray.
Before placing the rolls in the oven, give them an egg wash for an enticing golden-brown finish. To do this, whisk one egg with a tablespoon of water until well combined. Use a pastry brush to gently apply the egg wash over the tops of the rolls, ensuring even coverage. This step not only enhances the visual appeal but also adds a slight sheen to the rolls.
Once the oven is preheated, bake the rolls for 20-25 minutes. Keep an eye on them; they should be golden brown on top and sound hollow when tapped on the bottom. If they’re browning too quickly, you can tent them with aluminum foil to prevent burning.
Serving Suggestions
When your Buttery Garlic Bliss Rolls emerge from the oven, let them cool slightly before serving. These rolls are best enjoyed warm and are incredibly versatile. Here are some delightful pairing suggestions:
– With Soups and Stews: Serve alongside a rich, hearty soup or stew. The rolls are perfect for dipping.
– As a Side Dish: Accompany your favorite pasta or grilled meats with these rolls for a delightful meal.
– Brunch Delight: Serve them with scrambled eggs and bacon for a perfect brunch addition.
If you find yourself with leftovers, don’t worry! These rolls can be creatively enjoyed in several ways:
– Garlic Roll Sandwiches: Slice them open and fill with your favorite sandwich ingredients for a delicious meal.
– Toast with Toppings: Toast the rolls and top with avocado, cheese, or even a spread of your choice.
– Bread Pudding: Use day-old rolls to create a savory or sweet bread pudding for a unique dessert.
Conclusion
Making Buttery Garlic Bliss Rolls from scratch is a gratifying culinary experience that fills your kitchen with wonderful aromas and provides a sense of accomplishment. The satisfaction of kneading the dough, allowing it to rise, and finally baking it into golden perfection is unmatched.
These rolls are not only delicious but also perfect for sharing with family and friends. The joy of serving homemade bread brings people together and creates lasting memories. Don’t hesitate to experiment with different herbs, spices, or even cheeses to make the recipe your own. Each variation will bring a new twist to this beloved recipe, ensuring that it remains a favorite in your household for years to come.
So, roll up your sleeves, gather your ingredients, and embark on this delightful baking journey. With a little patience and creativity, you’ll have a batch of irresistible Buttery Garlic Bliss Rolls ready to enjoy!