Introduction
If you’re looking for a deliciously fun and portable dessert, look no further than cheesecake balls. This delightful twist on traditional cheesecake takes all the creamy goodness we love and transforms it into bite-sized treats that are perfect for any occasion. Whether you’re hosting a party, celebrating a holiday, or simply craving a sweet indulgence, these irresistible white chocolate raspberry cheesecake balls will certainly impress your guests and satisfy your sweet tooth.
The combination of smooth, rich cream cheese and tangy fresh raspberries, all enveloped in a luscious coating of white chocolate, creates a symphony of flavors that is hard to resist. Each bite is a perfect balance of sweetness and tartness, making these cheesecake balls not only visually appealing but also a delightful experience for your taste buds. In this article, we will walk you through the process of creating these decadent dessert balls, ensuring that you achieve the perfect texture and flavor every time.
Understanding the Ingredients
To make the best white chocolate raspberry cheesecake balls, it’s essential to understand the key components that contribute to their flavor and texture. Let’s take a closer look at the ingredients you will need:
Key Ingredients
1. Cream Cheese: This is the primary ingredient in cheesecake and provides its characteristic richness and creaminess. Opt for a high-quality cream cheese, as it will significantly affect the final texture and flavor of your dessert.
2. Powdered Sugar: This sweetener is crucial to achieving the desired sweetness without the graininess that granulated sugar can sometimes impart. It dissolves easily into the cream cheese, creating a smooth filling.
3. Vanilla Extract: A splash of pure vanilla extract adds warmth and depth to the flavor profile. It complements the sweetness of the cream cheese and the tartness of the raspberries perfectly.
4. Fresh Raspberries: The star of the show, fresh raspberries not only provide a vibrant color but also a burst of tartness that cuts through the richness of the cream cheese. Make sure to choose ripe, juicy berries for the best flavor.
5. Graham Crackers: Crushed graham crackers are often included to replicate the classic cheesecake crust. They add a subtle crunch and enhance the overall texture.
6. White Chocolate: As the outer coating, melted white chocolate gives these cheesecake balls a beautiful finish and a sweet, creamy flavor that pairs wonderfully with the raspberries.
Optional Ingredients
– Coconut Oil: While not necessary, adding a small amount of coconut oil to the melted white chocolate can improve the texture and make the chocolate easier to work with. It helps the chocolate to flow more smoothly when coating the cheesecake balls, preventing it from becoming too thick.
Using high-quality ingredients is paramount when it comes to baking and dessert-making. Not only do they affect the taste, but they also influence the texture and appearance of your final product. For the best results, always choose fresh, high-quality ingredients for this recipe.
Step-by-Step Guide to Making Cheesecake Balls
Preparing the Cheesecake Filling
To start, we will prepare the luscious cheesecake filling that serves as the base for our dessert balls. Here’s how to do it:
1. Mixing the Ingredients: Begin by taking your softened cream cheese and placing it in a large mixing bowl. Using an electric mixer, beat the cream cheese on medium speed until it is smooth and creamy. This step is crucial, as achieving a smooth consistency will ensure that your cheesecake balls have a delightful texture.
2. Adding Sweetness: Gradually add the powdered sugar to the cream cheese while continuing to mix. Start with a small amount and increase as you go, allowing the sugar to fully incorporate before adding more. This will help avoid any clumps and result in a silky filling.
3. Flavoring with Vanilla: Once the sugar is fully mixed in, add the vanilla extract. Continue to beat the mixture until everything is combined and the filling is smooth, which typically takes about 2-3 minutes. The mixture should be creamy and free of lumps.
Incorporating Raspberries for Flavor and Color
Now that you have your cheesecake filling ready, it’s time to incorporate the fresh raspberries:
1. Preparing the Raspberries: Gently rinse the raspberries under cold water and pat them dry with a paper towel. If they are particularly large, you may want to cut them in half, but be careful not to mash them.
2. Folding in the Raspberries: Using a spatula, gently fold the raspberries into the cheesecake mixture. Be cautious during this step; you want to maintain the integrity of the raspberries while ensuring they are evenly distributed throughout the filling. The vibrant color of the raspberries will create a beautiful marbled effect in the cheesecake balls.
3. Adding Crushed Graham Crackers: Next, add the crushed graham crackers to the mixture, folding them in until they are evenly combined. The graham crackers will add a delightful texture and flavor that mimics the classic cheesecake crust.
Chilling the Mixture
Before moving on to shaping the cheesecake balls, it’s crucial to chill the mixture:
1. The Importance of Chilling: Chilling allows the fats in the cream cheese to solidify slightly, making the mixture easier to scoop and shape. It also helps the flavors meld together, enhancing the overall taste of the dessert.
2. How Long to Chill: Transfer the cheesecake filling to the refrigerator and allow it to chill for at least 30 minutes. You can also cover the bowl with plastic wrap to prevent any odors from the fridge from affecting the filling.
3. Knowing When It’s Ready: After chilling, the filling should be firm enough to scoop but still soft enough to shape into balls. If it feels too soft, allow it to chill a bit longer.
Forming the Cheesecake Balls
Once the mixture is adequately chilled, it’s time to shape the cheesecake balls:
1. Scoop and Shape: Using a small cookie scoop or a tablespoon, scoop out a portion of the cheesecake filling. Roll it in your hands to form a smooth ball. Aim for uniformity in size, as this will create an appealing presentation when the balls are coated and served.
2. Best Practices for Handling: If the mixture starts to stick to your hands, you can lightly dust them with powdered sugar or dip them in cold water to prevent sticking. This will make the process much easier and help maintain the shape of the balls.
Melting the White Chocolate
Now that your cheesecake balls are formed, it’s time to prepare the white chocolate coating:
1. Chopping the Chocolate: Take your white chocolate and chop it into small, even pieces. This will help it melt more evenly and prevent any scorching.
2. Melting the Chocolate: You can melt the white chocolate using a double boiler or in the microwave. If using the microwave, place the chopped chocolate in a microwave-safe bowl and heat in 30-second intervals, stirring between each interval until smooth. If using a double boiler, place the chopped chocolate in a heatproof bowl set over simmering water, stirring occasionally until melted.
3. Adding Coconut Oil (Optional): If you’re using coconut oil, add it to the melted chocolate and stir until fully incorporated. This will create a smooth, glossy coating for your cheesecake balls.
Now that you have prepared the cheesecake filling and melted the white chocolate, you are ready to proceed with coating the cheesecake balls. In the next part of this article, we will discuss how to dip the cheesecake balls in white chocolate and provide tips for achieving the perfect finish. Stay tuned for more delicious details!
The Art of Crafting Irresistible White Chocolate Raspberry Cheesecake Balls
When it comes to creating decadent desserts, the process is just as important as the ingredients. In this section, we will delve into essential techniques that ensure your white chocolate raspberry cheesecake balls turn out perfectly. From achieving the right consistency in your cheesecake mixture to mastering the chocolate coating, every step counts in crafting these delightful treats.
Stirring and Temperature Control
One of the most critical aspects of preparing your cheesecake mixture is ensuring the right temperature and stirring technique. Begin by using room temperature cream cheese, as this allows for a smoother mixture and prevents lumps. When combining your ingredients, use a spatula or a mixer on low speed to gently fold in the raspberry puree and sugar. Avoid vigorous stirring, as this can incorporate too much air, leading to cracks in your cheesecake balls.
Additionally, when melting your white chocolate, maintaining a low and steady heat is essential. This can be achieved using a double boiler or the microwave at short intervals. Stirring is crucial here; it helps distribute the heat evenly and prevents the chocolate from burning. If the chocolate scorches, it can ruin the entire batch—so patience is key.
Coating the Balls in Chocolate
Once your cheesecake mixture is chilled and shaped into balls, it’s time to coat them in melted white chocolate. This step not only adds sweetness but also creates a beautiful finish. To achieve an even coat, use a fork or a dipping tool designed for chocolate. Carefully dip each cheesecake ball into the melted chocolate, ensuring it is fully submerged.
Let the excess chocolate drip off before placing the balls on a parchment-lined baking sheet. This excess chocolate can create unsightly clumps, so take your time during this process. A smooth finish enhances the overall presentation and ensures an appealing taste.
Adding the Graham Cracker Coating
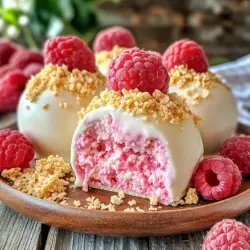
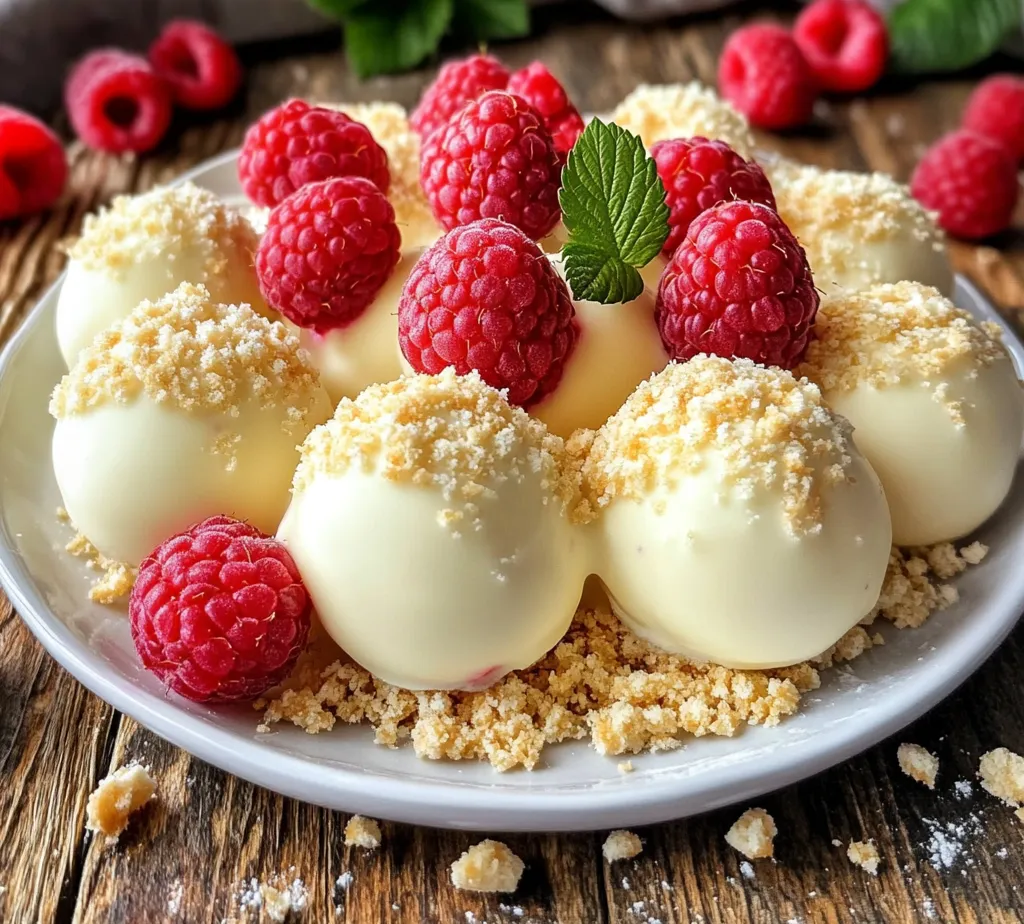
To elevate the texture and flavor of your cheesecake balls, consider adding a graham cracker coating. After dipping the balls in chocolate, roll them in finely crushed graham crackers. This adds a delightful crunch that complements the creamy interior.
For even coverage, place the crushed graham crackers in a shallow bowl. Roll each chocolate-coated ball gently in the crumbs, ensuring they are evenly coated. This not only adds flavor but also visually distinguishes your cheesecake balls, making them more enticing.
Final Chilling for Setting
After the chocolate coating and graham cracker roll, it’s time for the final chilling phase. Place the coated cheesecake balls back in the refrigerator for at least 30 minutes. This step is crucial as it allows the chocolate to set properly, ensuring that your cheesecake balls hold their shape when served.
Timing is essential here; if chilled too long, the chocolate may become overly firm. Aim for a texture that is firm yet creamy, perfect for a delightful bite.
Presentation and Serving Suggestions
Now that your cheesecake balls are perfectly set, it’s time to think about presentation. A beautiful display can elevate your dessert from simple to stunning. Here are some creative ideas:
Garnishing with Fresh Raspberries
Fresh raspberries are not only a delicious complement to the white chocolate raspberry cheesecake balls but also add a pop of color. Arrange a few whole raspberries on top of each ball or create a small cluster on the serving platter. This not only enhances the aesthetic appeal but also reinforces the flavor profile of your dessert.
Serving Styles
Consider how you want to serve your cheesecake balls. You can place them on a decorative platter for a more formal presentation or use colorful cupcake liners for a fun, casual approach. If you’re hosting a party, individual servings in small cups can also be an eye-catching option.
Pairing Ideas with Beverages
Think about what beverages would pair well with your cheesecake balls. A rich cup of coffee or a light herbal tea can complement the sweetness beautifully. For those seeking something more festive, consider offering dessert wines or sparkling beverages that accentuate the flavors of the white chocolate and raspberry.
Nutritional Information
While the indulgence of cheesecake balls is undeniable, being aware of the nutritional content is essential for many. Here’s a basic breakdown of nutritional values per serving (approximately one cheesecake ball):
– Calories: 120
– Total Fat: 8g
– Saturated Fat: 5g
– Cholesterol: 20mg
– Sodium: 30mg
– Total Carbohydrates: 12g
– Dietary Fiber: 1g
– Sugars: 9g
– Protein: 2g
For those looking to modify the recipe for dietary preferences, consider using gluten-free graham crackers as a substitute. Additionally, you can reduce the sugar content by using sugar alternatives or opting for a sugar-free chocolate coating.
Why This Recipe is Perfect for Any Occasion
These white chocolate raspberry cheesecake balls are incredibly versatile, making them suitable for various occasions. Whether you’re celebrating a birthday, holiday, or a casual gathering with friends, these treats are sure to impress.
The best part? They can be made in advance. Prepare them a day or two ahead of your event and store them in the refrigerator until ready to serve. This convenience allows you to enjoy your time with guests, knowing that a delightful dessert is ready and waiting.
Conclusion
Crafting white chocolate raspberry cheesecake balls is a delightful experience filled with sweet rewards. From the careful preparation of the cheesecake filling to the final touches of chocolate and graham cracker coating, each step adds to the joy of homemade desserts.
As you embark on this culinary adventure, we encourage you to try the recipe and share your experiences with family and friends. Homemade desserts not only bring joy to those you serve but also create lasting memories in the kitchen. So gather your ingredients, channel your inner chef, and prepare to impress with these irresistible cheesecake balls!