Introduction
In the vast world of desserts, cake balls have carved out a special niche that combines the nostalgia of cake with the convenience of bite-sized treats. These delightful morsels have gained immense popularity, particularly at celebrations, parties, and festive gatherings, thanks to their visually appealing aesthetic and rich flavors. Among the many variations, Velvety Red Bliss Cake Balls stand out, not only for their eye-catching red hue but also for their luxurious taste and texture.
Red velvet cake, with its striking crimson color and velvety softness, has long been a favorite at special occasions, especially in the southern United States. The cake’s rich cocoa flavor, combined with a hint of tanginess from buttermilk and cream cheese, creates an indulgent experience that is simply irresistible. The Velvety Red Bliss Cake Balls take this beloved cake and transform it into a portable delight, perfect for sharing, gifting, or simply indulging in during a quiet moment at home.
These cake balls are more than just a dessert; they are a celebration of flavor and convenience. Whether you’re planning a birthday party, a romantic dinner, or a casual get-together with friends, these cake balls are a sure way to please your guests and elevate any occasion.
The Charm of Red Velvet Cake
Red velvet cake has a rich history that traces back to the 19th century, gaining prominence in the southern United States in the early 20th century. Its unique combination of ingredients not only gives it a stunning appearance but also a distinct flavor profile that sets it apart from other cakes. Traditionally, red velvet cake is made with cocoa powder, which lends a subtle chocolate flavor, while the buttermilk and vinegar contribute to its moistness and tang. The iconic red color, originally achieved through the reaction of cocoa powder with acidic ingredients, has evolved over time, with many modern recipes opting for red food coloring to achieve that vibrant hue.
The texture of red velvet cake is another aspect that contributes to its charm. It’s soft and tender, almost like a cloud, making each bite a melt-in-your-mouth experience. This luxurious texture, paired with the creamy richness of cream cheese frosting, creates an indulgent treat that is perfect for any celebration.
As baking trends have evolved, red velvet has emerged as a versatile flavor choice that transcends traditional cake formats. Today, it can be found in a variety of desserts, from cupcakes to pancakes, and now, cake balls. The transition from cake to cake balls allows for an even more delightful way to enjoy this classic flavor, offering a portable dessert that can be easily made ahead of time and served at any gathering.
Ingredients Breakdown
Creating the Velvety Red Bliss Cake Balls begins with a careful selection of ingredients, each playing a crucial role in achieving the perfect flavor and texture. Here’s a closer look at the key components that make this recipe a standout:
Red Velvet Cake Mix
Using a red velvet cake mix simplifies the baking process, making it accessible for bakers of all skill levels. While some may prefer to make their cake from scratch, a high-quality mix ensures a consistent result and saves time. The cake mix provides the essential flavors of cocoa and vanilla without the need for measuring numerous ingredients, making it an excellent choice for busy bakers.
Eggs, Vegetable Oil, and Water
These three ingredients are fundamental in creating a moist and tender cake. Eggs add structure and stability, while vegetable oil contributes to the cake’s moisture and softness. Water, often overlooked, helps to activate the dry ingredients in the mix, ensuring a smooth batter. The combination of these elements works together to create the ideal base for your cake balls.
Cream Cheese Frosting
The role of cream cheese frosting cannot be overstated in this recipe. It not only enhances the flavor of the cake balls but also binds the cake crumbs together, allowing for easy shaping. The tanginess of the cream cheese perfectly complements the sweetness of the cake, creating a balanced flavor profile that is both rich and satisfying. You can either use store-bought cream cheese frosting for convenience or whip up a quick homemade version if you prefer.
White Chocolate
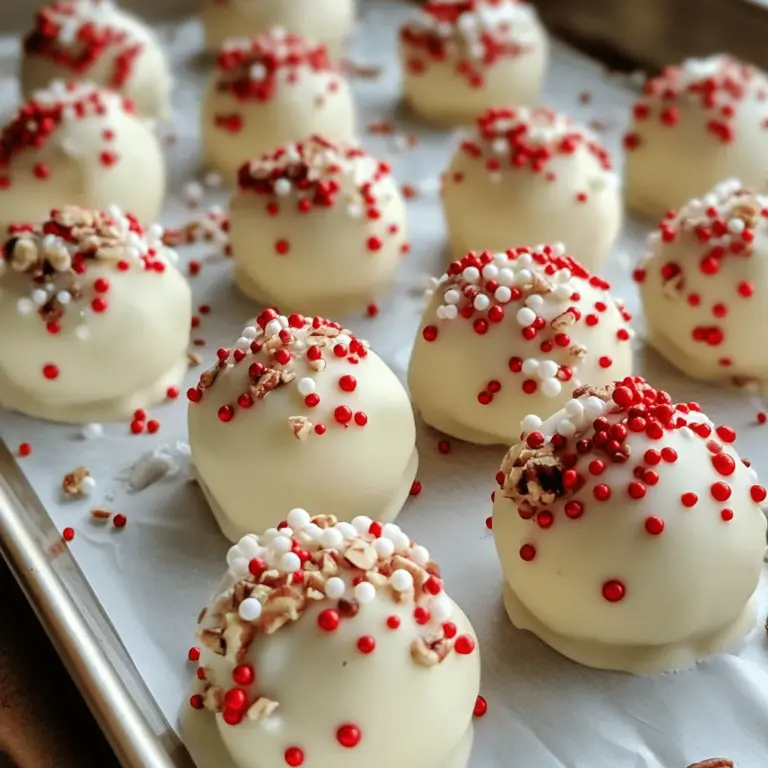
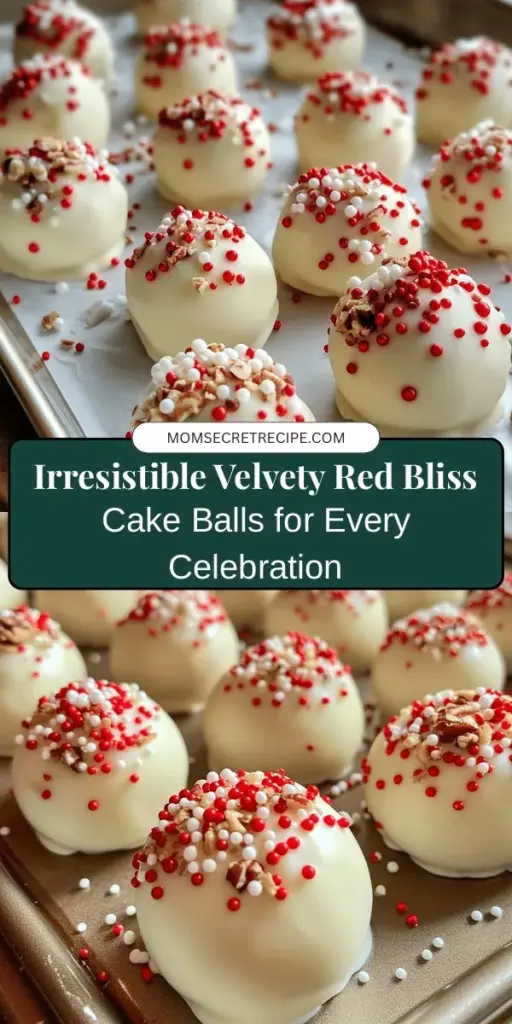
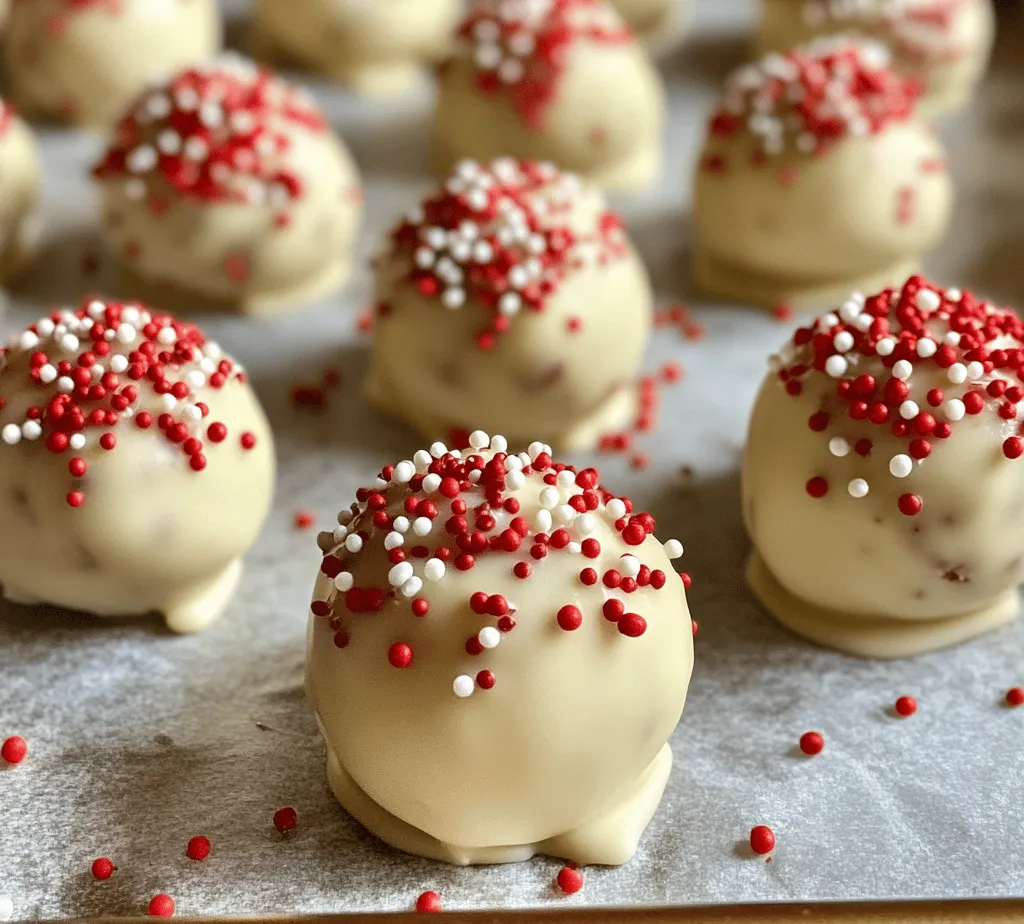
For coating the cake balls, white chocolate is the ideal choice. Its sweet, creamy flavor pairs beautifully with the red velvet cake, creating a striking contrast that is visually appealing. Additionally, white chocolate melts smoothly, making it easy to dip the cake balls for a polished finish.
Optional Ingredients: Crushed Pecans or Walnuts
For those looking to add an extra layer of flavor and texture to their Velvety Red Bliss Cake Balls, incorporating crushed pecans or walnuts is a delightful option. These nuts add a satisfying crunch that complements the soft cake and creamy frosting. They also bring a hint of nuttiness that enhances the overall flavor of the dessert, making it even more irresistible.
Step-by-Step Instructions
Now that we have thoroughly explored the ingredients, it’s time to dive into the step-by-step instructions for creating these delectable Velvety Red Bliss Cake Balls. This detailed guide will ensure that you achieve the best results, resulting in cake balls that are both visually stunning and delicious.
Step 1: Bake the Red Velvet Cake
– Preheat your oven to the temperature indicated on the cake mix package, generally around 350°F (175°C).
– Prepare a standard 9×13-inch baking pan by greasing it lightly or lining it with parchment paper.
– In a large mixing bowl, combine the red velvet cake mix, eggs, vegetable oil, and water as per the instructions on the package. Mix until well blended and smooth.
– Pour the batter into the prepared pan, spreading it evenly. Bake for the time recommended on the cake mix package, typically 25-30 minutes, or until a toothpick inserted into the center comes out clean.
– Once baked, allow the cake to cool in the pan for about 10 minutes before transferring it to a wire rack to cool completely.
Step 2: Crumble the Cake
– Once the cake is completely cool, crumble it into a large mixing bowl. Use your hands or a fork to break it into small, fine crumbs. The finer the crumbs, the easier it will be to form the cake balls.
– Make sure to remove any crusty edges for a smoother texture.
Step 3: Add the Cream Cheese Frosting
– Gradually add the cream cheese frosting to the crumbled cake. Start with about half a cup and mix well. You want the mixture to be moist enough to hold together but not overly wet.
– If the mixture feels too dry, continue adding frosting a tablespoon at a time until you achieve the desired consistency. The goal is to be able to form the cake into balls without it falling apart.
Step 4: Shape the Cake Balls
– Using your hands, scoop out portions of the cake mixture and roll them into 1-inch balls. Place the formed cake balls on a baking sheet lined with parchment paper.
– Continue this process until all the mixture is shaped into balls. You should yield around 24-30 cake balls, depending on the size.
Step 5: Chill the Cake Balls
– Once all the cake balls are shaped, place the baking sheet in the refrigerator for at least 30 minutes. Chilling them will help firm up the cake balls, making them easier to dip in chocolate later.
Step 6: Prepare the White Chocolate Coating
– While the cake balls are chilling, melt the white chocolate in a microwave-safe bowl. Heat in 30-second intervals, stirring in between, until the chocolate is completely melted and smooth. Be careful not to overheat, as white chocolate can burn easily.
– If you desire a thinner coating, you can add a small amount of vegetable oil to the melted chocolate to achieve the desired consistency.
Step 7: Dip the Cake Balls
– Once the cake balls have chilled, remove them from the refrigerator. Using a fork or a dipping tool, dip each ball into the melted white chocolate, ensuring it is fully coated.
– Allow excess chocolate to drip off before placing the dipped cake balls back onto the parchment-lined baking sheet.
Step 8: Garnish and Set
– If you’d like, sprinkle crushed pecans or walnuts on top of the wet white chocolate coating for added flavor and texture.
– Let the cake balls sit at room temperature until the chocolate has set. You can also place them in the refrigerator for faster setting.
This introduction and initial steps provide a comprehensive overview of the Velvety Red Bliss Cake Balls recipe, capturing the essence of this delightful dessert while laying the groundwork for a successful baking experience. Stay tuned for the continuation, where we will explore additional tips for achieving the best results and answer some common questions related to this delectable treat.
Baking the Cake: Importance of Oven Temperature and Baking Time
To achieve the perfect Velvety Red Bliss Cake Balls, the first step is baking a flawless red velvet cake. The temperature of your oven and the baking time are critical factors that can make or break your cake. Preheat your oven to 350°F (175°C) and ensure it reaches this temperature before placing your cake in. An accurate oven temperature guarantees even baking, allowing the cake to rise properly and develop that signature velvety texture.
For a standard 9-inch round cake, the baking time is typically between 25 to 30 minutes. Use a toothpick inserted into the center to test for doneness; if it comes out clean or with a few crumbs attached, your cake is ready. Be cautious not to overbake, as this can lead to a dry texture, which is not ideal for cake balls. Once baked, allow the cake to cool in the pan for about 10 minutes before transferring it to a wire rack to cool completely. This cooling stage is crucial, as it will prevent your cake from becoming too dense when crumbling.
Techniques for Crumbling Cake to Achieve the Right Consistency
Once your cake has cooled completely, it’s time to crumble it. The consistency of the crumbs is essential for the creation of your cake balls. Using your hands, gently break the cake into large pieces before moving on to the crumbling process. You can also use a food processor for a quicker method, but be careful not to over-process, as you want a fine crumb without turning it into powder.
The ideal crumb consistency resembles moist sand. If your cake is too dry, the cake balls may fall apart, while overly moist crumbs can lead to mushy balls. If you find your cake is a bit too dry, adding a tablespoon of frosting while crumbling can help adjust the moisture levels. Remember, the goal is to achieve a texture that holds together well when rolled into balls.
Mixing Frosting with Cake Crumbs: Tips for Ensuring a Uniform Blend
The mixing of frosting with your crumbled cake is a crucial step in creating Velvety Red Bliss Cake Balls. For this recipe, use cream cheese frosting, which complements the red velvet flavor perfectly. Start by adding a small amount of frosting to the cake crumbs, about a quarter cup at first. Use your hands to mix the two ingredients thoroughly, ensuring every crumb is coated with frosting.
Continue to add frosting gradually until the mixture is moist enough to hold together when rolled into a ball. The right balance is key; too much frosting will make the balls overly sweet and difficult to shape, while too little will prevent them from holding together. The mixture should feel slightly sticky but not wet. Once you have the perfect blend, it’s time to shape your cake balls.
Shaping the Cake Balls: Recommended Tools and Techniques for Perfect Size and Shape
To form your cake balls, use a small cookie scoop or your hands for uniformity. A cookie scoop allows for consistent sizing, which is essential for presentation and even coating during the dipping process. Aim for about one tablespoon of the mixture for each ball. Roll the mixture between your palms to create smooth, round balls.
If you find the mixture sticking to your hands, lightly dust your palms with cocoa powder or a bit of powdered sugar. Once formed, place the cake balls on a parchment-lined baking sheet for easy transfer to the freezer. Chill the cake balls for at least 30 minutes. This chilling period helps the cakes firm up, making them easier to dip in chocolate later.
Melting Chocolate: Best Practices for Achieving a Smooth Consistency
Melting chocolate can be a delicate process, but with the right techniques, you can achieve a smooth, glossy finish for your cake balls. Start with high-quality chocolate; chocolate chips or bars work well. Chop the chocolate into small, even pieces to ensure it melts uniformly.
You can melt chocolate in a microwave or using a double boiler. If using a microwave, heat the chocolate in 30-second intervals, stirring between each interval to prevent burning. Alternatively, for a double boiler, place a heatproof bowl over a pot of simmering water, making sure the bowl doesn’t touch the water. Stir the chocolate until it’s completely melted and smooth.
For a thinner consistency, you can add a teaspoon of coconut oil or shortening, which will help create a more fluid chocolate that coats the cake balls evenly without clumping.
Dipping the Cake Balls: Tips for Even Coating and Avoiding Clumps
Dipping the chilled cake balls into the melted chocolate is where the magic happens. Using a fork, dip each cake ball into the chocolate, ensuring it’s fully coated. Allow any excess chocolate to drip off before transferring the cake ball back to the parchment-lined baking sheet.
To avoid clumping, ensure that the chocolate remains melted and fluid throughout the dipping process. If you notice the chocolate beginning to thicken, return it to the heat briefly to re-melt. Work in batches, dipping a few cake balls at a time, to keep the process efficient.
If desired, you can use a toothpick or skewer to help dip the cake balls, providing a better grip. Once dipped, you can sprinkle with toppings while the chocolate is still wet for added flair.
Decorating with Sprinkles and Nuts: Creative Ideas for Customization
Once your cake balls are coated in chocolate, it’s time to decorate! This is where you can let your creativity shine. Consider using a variety of toppings like colorful sprinkles, crushed nuts, or even shredded coconut to add texture and visual interest.
For a festive touch, use red and white sprinkles for a holiday theme, or gold and silver for celebrations like New Year’s Eve. You can also drizzle contrasting melted chocolate over the coated cake balls for an elegant finish. Simply melt a small amount of chocolate in a contrasting color and use a fork or piping bag to drizzle it over the tops of the cake balls.
Serving Suggestions and Pairings
These Velvety Red Bliss Cake Balls are perfect for various occasions. Whether it’s a birthday party, wedding reception, or holiday gathering, they bring a touch of elegance and sweetness to any event.
Presentation Styles: Consider displaying your cake balls on a beautiful cake stand for a centerpiece effect. Alternatively, create an eye-catching dessert table with an assortment of treats, including these cake balls. They also make delightful party favors when packaged in clear bags tied with ribbons.
Beverage Pairings: For a delightful pairing, serve your cake balls with beverages such as coffee, hot chocolate, or tea. The richness of the cake balls complements the warmth of these drinks. For an adult gathering, consider pairing them with dessert wines or champagne for a more sophisticated touch.
Storage and Shelf Life
To maintain the freshness of your Velvety Red Bliss Cake Balls, proper storage is essential. They can be kept in an airtight container at room temperature for up to three days. For longer storage, consider refrigerating them, where they can last for about a week.
If you want to prepare them in advance, freezing is a great option. Place the cake balls on a baking sheet in a single layer and freeze until solid. Once frozen, transfer them to an airtight container or a resealable freezer bag. They can be stored in the freezer for up to three months. When ready to enjoy, simply thaw them in the refrigerator overnight before serving.
Conclusion
Creating and sharing Velvety Red Bliss Cake Balls is a delightful experience that brings joy to both the baker and the guests. This recipe combines the simple pleasure of baking with the fun of decorating and customizing to suit any occasion. The straightforward process makes it accessible for bakers of all skill levels, while the final product is sure to impress.
Whether you’re celebrating a birthday, wedding, or holiday gathering, these cake balls are a versatile treat that can be adapted to fit your personal taste and style. Embrace your creativity and try different flavors, decorations, and presentations. With this recipe, you can make every occasion a little sweeter, leaving a lasting impression on your family and friends. Enjoy the process, and don’t forget to share your creations!
